Two-factor authentication- 2FA
****IMPORTANT NOTE**** An app compatible with OTP must have been previously installed on an external device If you use an Android device, you can use Google Authenticator for Android. If you use an iOS device (Apple), you can install Google Authenticator for iPhone. |
Mailrelay can offer you the best login security system: two-factor authentication (2FA). It is basically an additional code, used together with the access password, generated on a personal device.
INDEX
- Two-factor authentication- 2FA
1.- Logging in after the code has already been activated
Remember that once activated, the system will request a second validation with a code that will be generated on a secondary device.
This code will be displayed in the 2FA Authentication application that has been previously installed.
Remember that if there are several people accessing the system, you should create users on the dashboard for each one of them and activate it for all users with their individual device, otherwise they will have to contact the administrator to get the code every time they need to log in.

If you need to access the system urgently but don't have the device with the app, you have received 5 backup access codes that you can use occasionally, for example if you have forgotten your device at home.
These codes were provided to the person who activated the authentication system, as we will see later; Codes must be noted in a safe place.
Codes are canceled after use, so once they have all been used, you will need to reset the 2FA system to get new codes.
If you do not have the device with the application or the backup codes, please contact support. If you set up a recovery phone number, we will send a recovery code via SMS; otherwise, we will explore other options with you.
2.- Login activation with two-factor authentication - 2FA
The process is very easy and is done through an application that supports OTP (exclusive use password). When the system requests its activation, or when the user wishes to activate it in their profile, the process to activate 2FA will begin.
These are the steps you should follow:
2.1.- An app compatible with OTP must have been previously installed on an external device
If you use an Android device, you can use Google Authenticator for Android. If you use an iOS device (Apple), you can install Google Authenticator for iPhone.
Once the OTP compatible application has been installed, we can now move on to activation, this is an example of what you will see in the next steps:

2.2.- Enable it in your user profile
In your profile under Two-Factor Authentication - Enable or after accepting the dashboard's suggestion, you will go to a screen where you must enter the current password on the right. Open the app and scan the QR Code or enter the code manually in the bottom corner in red.
2.3.- Request the codes
The application will generate a 6-digit number that must be added on the right in the code field. Then click the blue "Turn on two-factor authentication" button.
Please note that the number expires in approximately 30 seconds. After this period, the application will generate another code of the same duration.

2.4.- Obtaining the code
On the next screen, 5 backup codes will be displayed that must be saved in a safe location. These codes must be used in case of an unforeseen event or emergency.
They will allow you to access your account immediately, even if you do not have your two-factor authentication device with you—for instance, if you are in a different location or have lost your authorized device.
Remember that every time you use a code, it will no longer be operational. If you use them all, you must reset your 2FA setting to get 5 more.

2.5.- Add an emergency cell phone
On the final screen, you can provide an emergency recovery mobile phone number to receive an access code via SMS. This is not mandatory, but we recommend adding it. Enter and confirm a phone number, as well as the password for the current user account for which you are setting up 2FA. If you enabled 2FA before this option was available, you will not have a recovery phone number; we will ask you for one periodically.
Very important: This phone number should not be associated with the device where you installed the app as explained on step 2.1, as it will be used precisely so you can recover access in the event of loss or theft of the device where the app was installed.
3.- Video tutorial
Here is a video tutorial on how to use 2FA easily:
4.- Loss of 2FA device
You can gain access using one of the 5 codes that were shown to you when you enabled 2FA. If you are still unable to access your account, please contact us via our contact department.
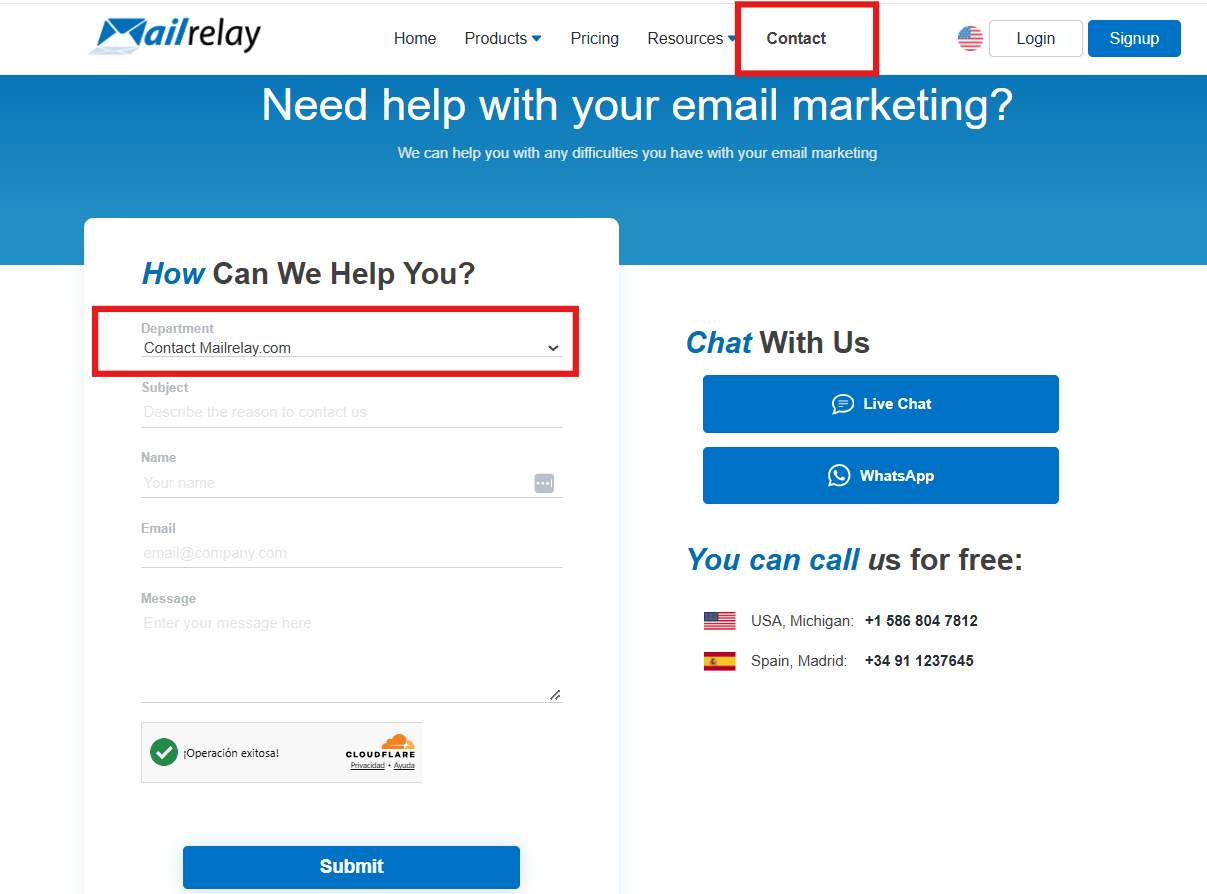
Once you have logged in, you need to disable 2FA and then re-enable it. You will be provided with a QR code, which you can use to link your Authenticator app again. You will also be given 5 new backup codes—these are the ones that will work from now on. Be sure to save them, as you can use them to access your account if you are ever unable to log in otherwise.
5.- Disable 2FA
You can disable 2FA by clicking on your name and then on "User Settings"; in the "2-Factor Authentication" section at the bottom, you will find the option to disable 2FA. You will be asked to enter your current password to proceed with disabling it:
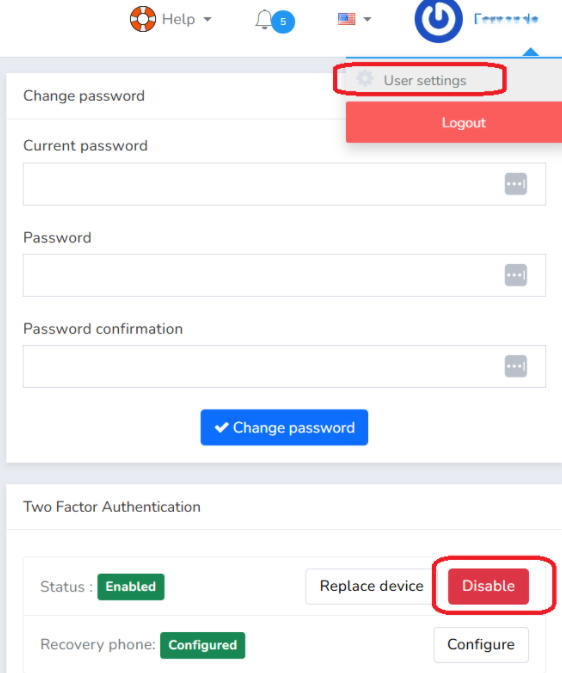
Then, if the user logs in and wants to enable it again, they can do so.
5.1- Disabling 2FA as an Administrator
An account administrator can also disable 2FA from within the account:
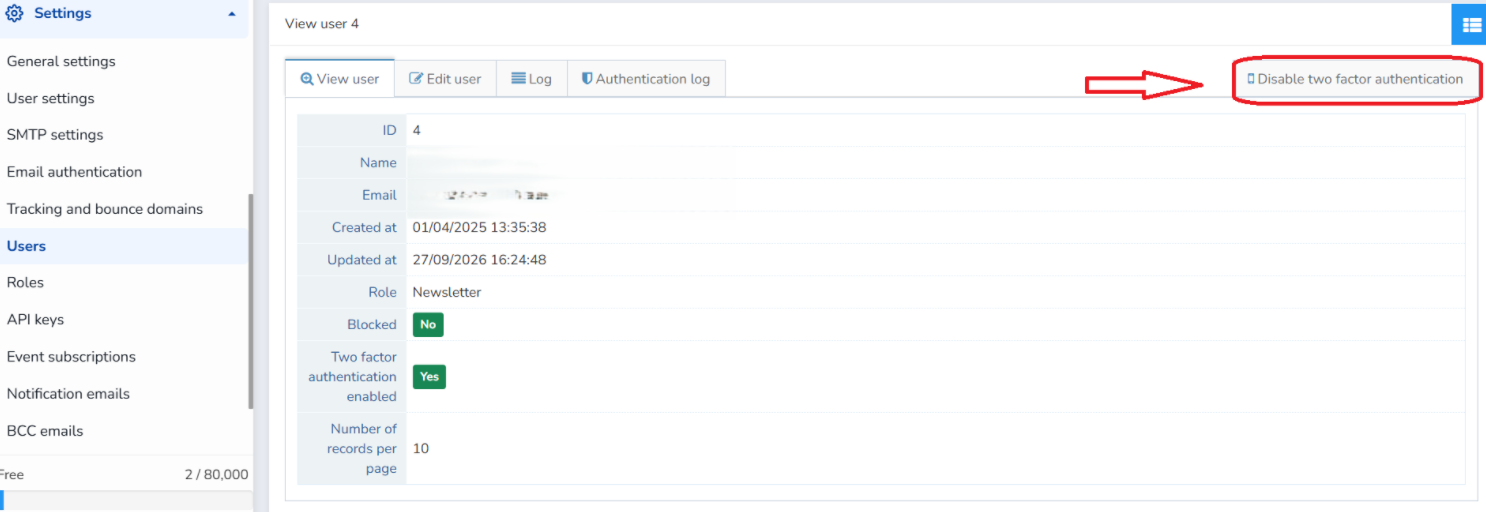
If the user wishes to re-enable 2FA later when logging in, they can do so.
Was this article helpful?
That’s Great!
Thank you for your feedback
Sorry! We couldn't be helpful
Thank you for your feedback
Feedback sent
We appreciate your effort and will try to fix the article