Automations
Email automation in Mailrelay allows you to carry out email sending actions autonomously so that, once you efficiently configure its behavior, it requires virtually no supervision on your part.
It is a high-value feature to take the performance of your marketing actions with Mailrelay to the next level, allowing you to save a significant amount of time on customer loyalty, lead recovery, completing sales, etc.
TABLE OF CONTENTS
1.- Where are automations located?
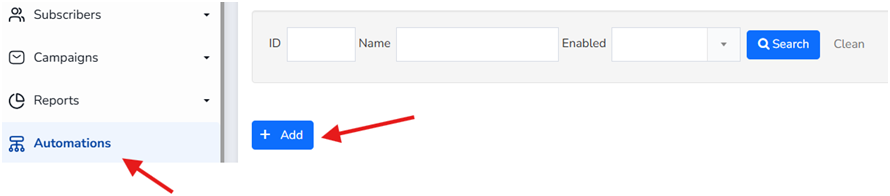
Let's see how you can set automations to work in your Mailrelay account. To do this, go to the main menu of your account located on the left side and click on the Automations option. This will allow you to view all the automations you have created and create new ones.
If it is your first time, the list will appear empty, but you can change that thanks to this tutorial.
2.- How to create an automation in Mailrelay
The process to create an automation is always the same:
- Go to the Automations option.
- Click on the +Add button.
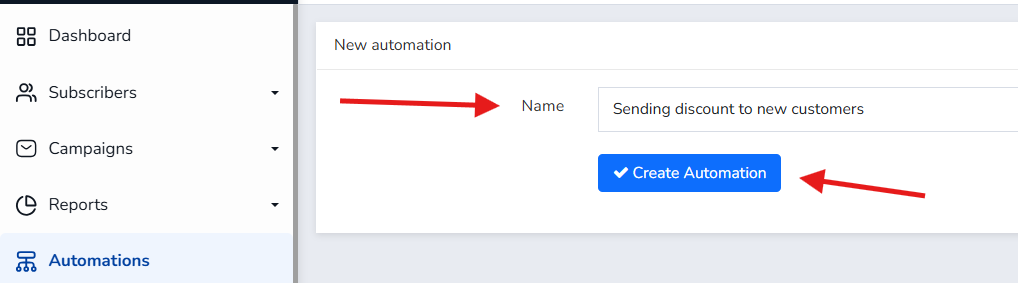
- Enter a name for the automation in Name and then click the Create Automation button.
This will take you to the visual automation editor, where you must click on the New entry point area to start the automation.

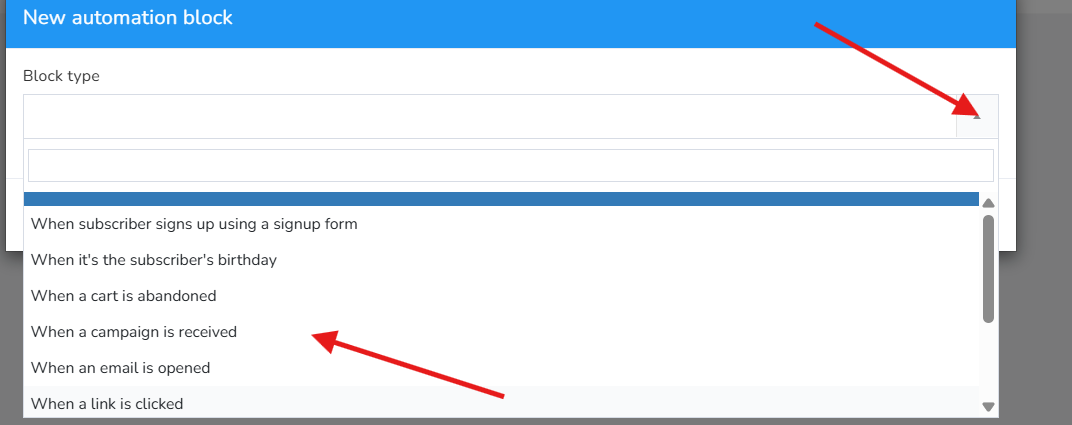
Now, all that remains is to click on the dropdown menu for the Block type option to start shaping the automation. Once created according to your needs, click on Save to save it.

Let's look at several examples, which are the most common for practically all businesses, so you can see it much more clearly with real-life cases.
3.- Most common automations
In your Mailrelay account, you can use various types of automations that can contain multiple conditionals and, in many cases, be combined with each other. For this reason, it is impractical to describe all possible combinations you can use.
But don't worry—we're going to review some of the most interesting ones that our users typically use to get the maximum benefit out of our email marketing system.
3.1.- Welcome new subscribers
This is one of the most common automations in any email marketing tool. It automatically sends a welcome email whenever someone subscribes to your list.
In the case of Mailrelay, it is very easy to implement. In this email, you can introduce yourself, link to important pages on your website, deliver a discount or another lead magnet you have used, etc.
Whenever a contact is added to the group—whether through an import, a form, or added manually—the automation will trigger.
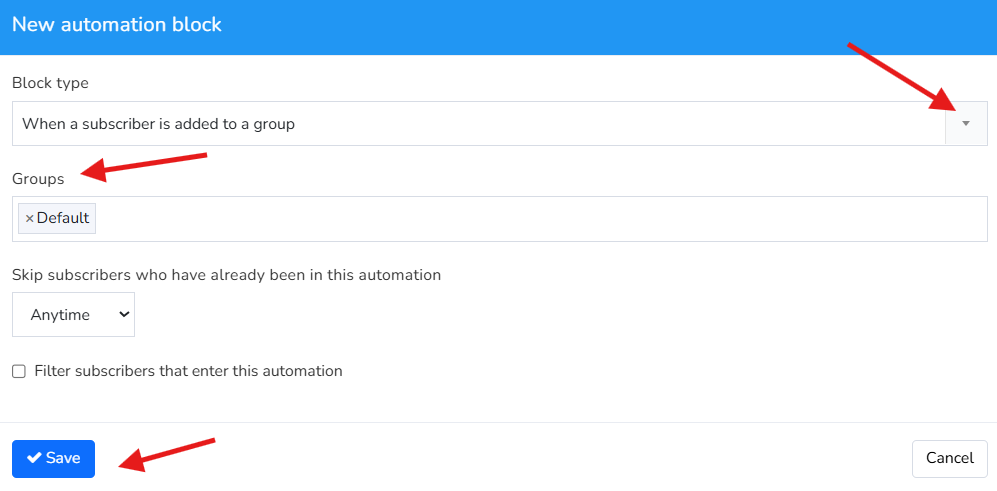
The first step is to select When a subscriber is added to a group in the Block type dropdown, then specify the group in Group, and click Save.
Now you must select the newsletter you wish to send when a subscriber is added to the group. To do this, click on Add.
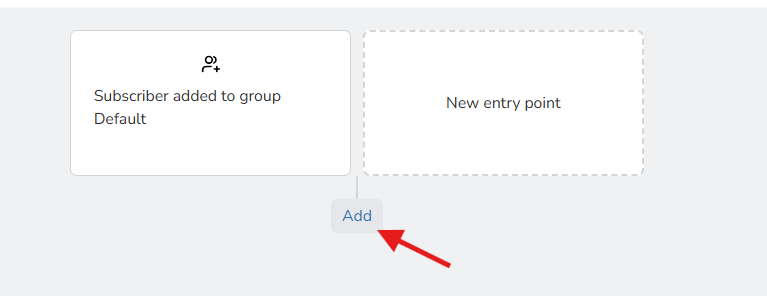
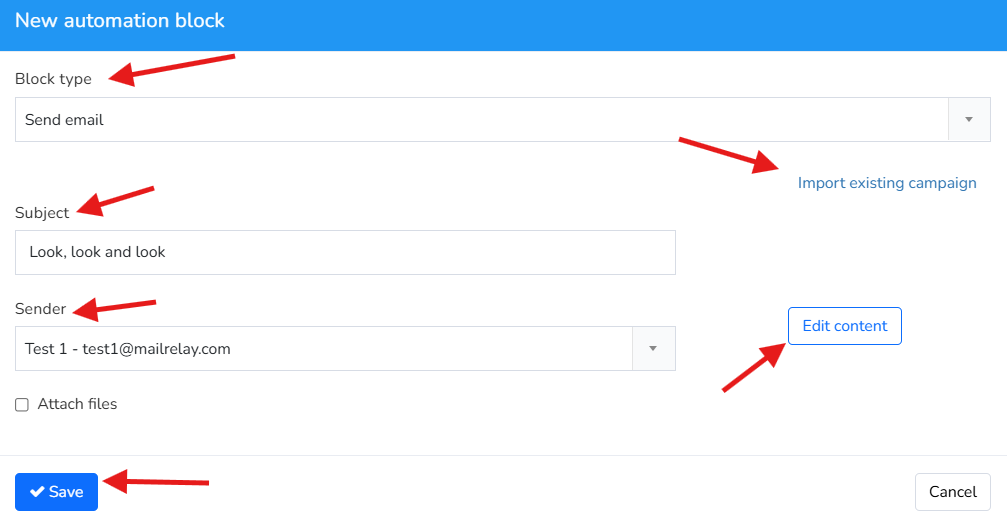
This time you need to select Send email in the Block type dropdown, then enter a subject for the email in Subject, and select the sender from which the email will be sent (the Sender dropdown).
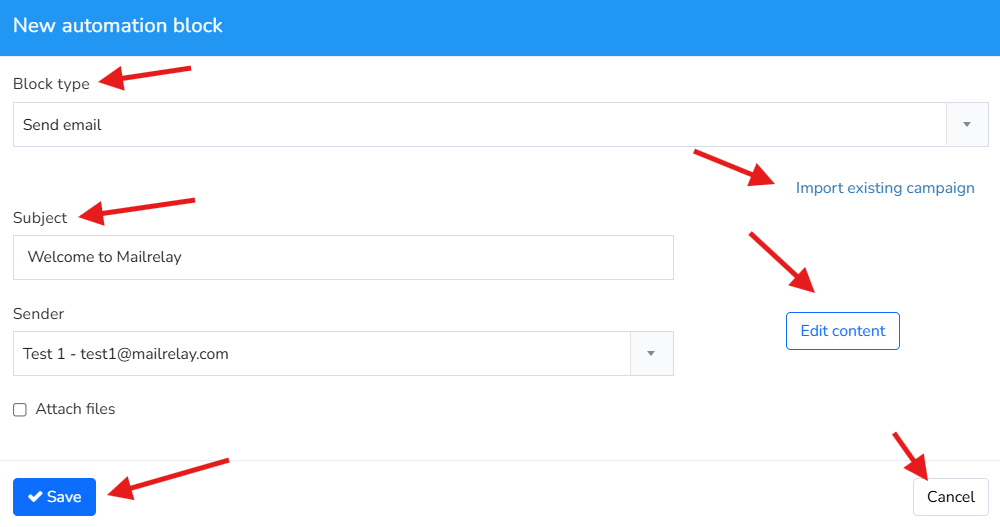
Now all that remains is to indicate the design you want to send. You can click on Import existing campaign to send a design you created previously, or create it right then by clicking on Edit content. With the design loaded or created, click Save, and your automation will be created.
Now simply click on Save and close to save your changes.
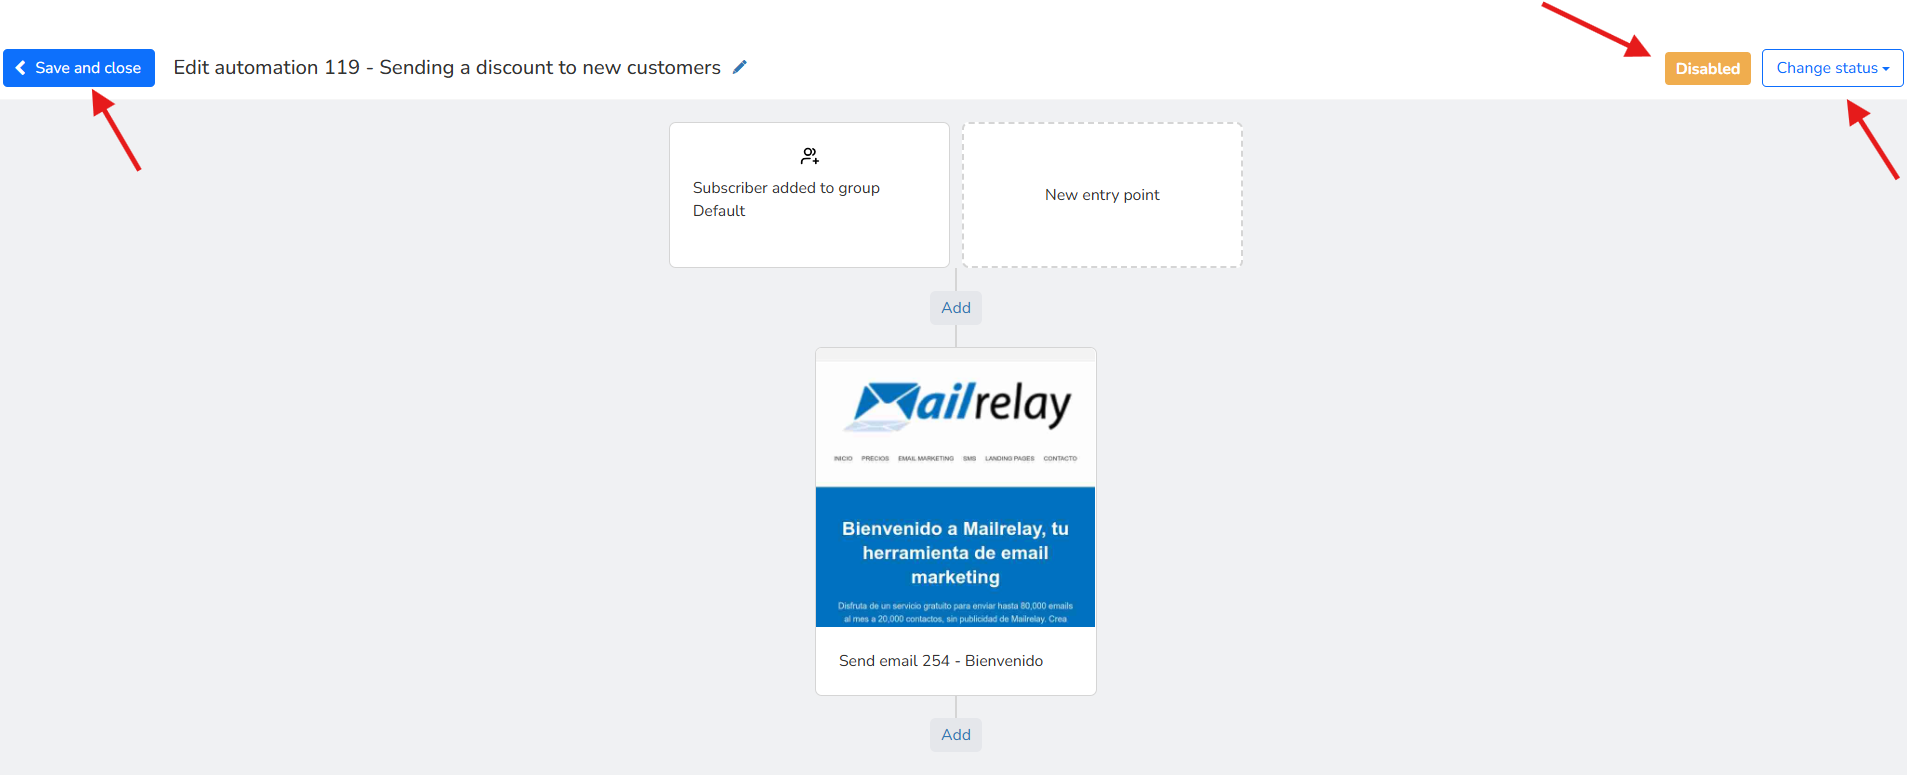
IMPORTANT: All automations are created disabled so that you can decide when you want them to start running. Therefore, they initially have the status Disabled (in orange). To activate them, click the dropdown button Change status and select Enable (this will change the automation status to Active, in green).
3.2.- Drip campaigns
Drip campaigns are communication campaigns based on sending automated emails to your subscribers. These emails generally vary depending on the actions taken by the customer. This sequence allows you to guide them through your sales funnel to achieve your defined goals.
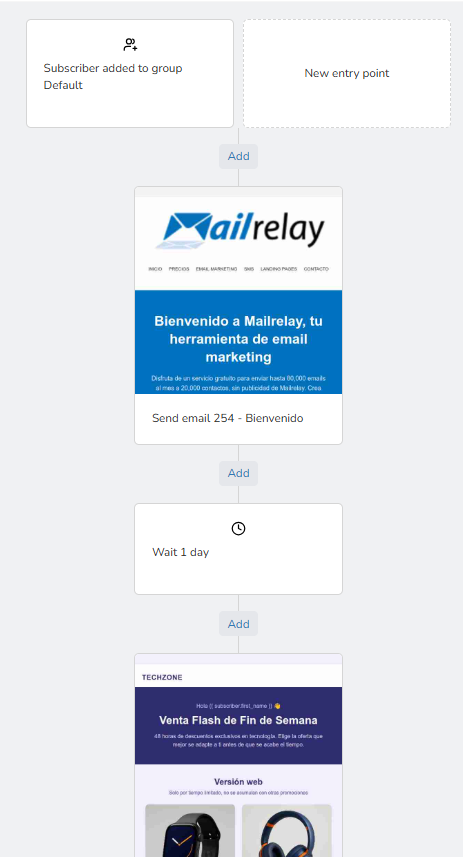
For example, you can send a welcome email, set a one-day pause, send the next email, set another pause, and so on.
In this example, we take the previous scenario as a starting point and expand it. Although we only extend it with two new steps, you could continue expanding it for more days if you wish.
In fact, it is ideal for creating a small sales funnel with a series of consecutive emails, where you nurture the interest of your contacts while addressing common questions and objections.
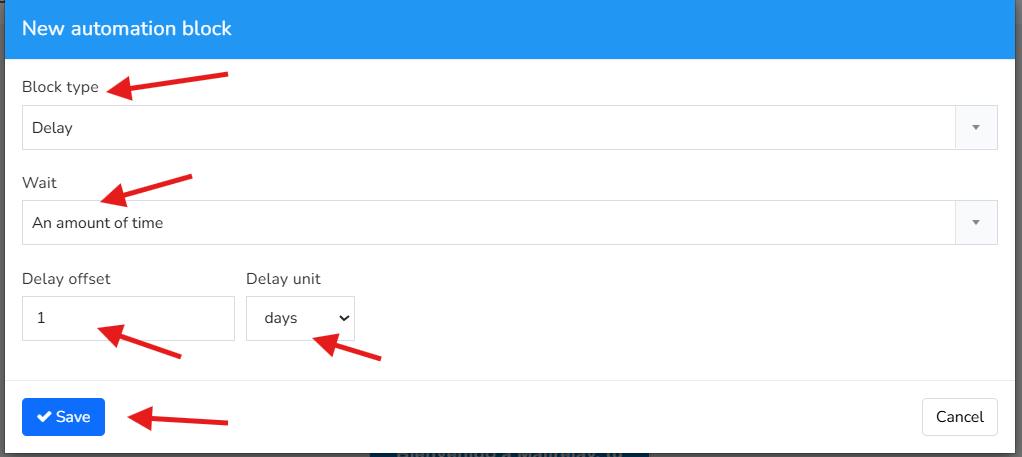
After sending the welcome email, we are going to wait one day and then send a second email. To do this, start by clicking on Add and select the next automation action.
In this case, select Wait in Block type, An amount of time in Wait, and define the wait time as 1 day (to do this, enter 1 in Wait offset and select days in Wait unit). Once ready, click Save.
Now, we will instruct it to send a new email after defining the one-day pause in the automation process.
To do this, select Send email in the Block type dropdown, enter a subject for the email in Subject, and select the sender from which the email will be sent (the Sender dropdown).
Next, select the design to send. You can click on Import existing campaign to send a design you already created, or create it now by clicking Edit content.
With the design ready—whether selected from a previous one or newly created—click Save, and your automation step will be complete.
This is how it will look, completed with the two newly added automations. Simply click the Save and close button to finish:
3.3.- Reactivating inactive users
We know how much effort it takes to acquire a lead, which is why it is essential to try to recover those who are not showing much interest in your products or services.
This automation is designed to reactivate users who haven't shown much interest in your recent communications. It is possible because Mailrelay establishes a "reputation" or rating system for contacts based on their activity (i.e., whether they interact with the emails you send, open them, click links, etc.).
Mailrelay assigns high scores to contacts who regularly open and click your emails, and low scores to those who do not. This isn't immediate, of course; it is a process that takes time. Therefore, if a contact has a low score, you know they haven't interacted with your emails in a while, and we can create a new entry point to re-engage them.
To do this, the first step is to identify the contacts who interact the least with your mailings. We need to segment contacts whose reputation score is between 1 and 2 (or low score range).
First, create a segment by navigating to Subscribers >> Segmentation.
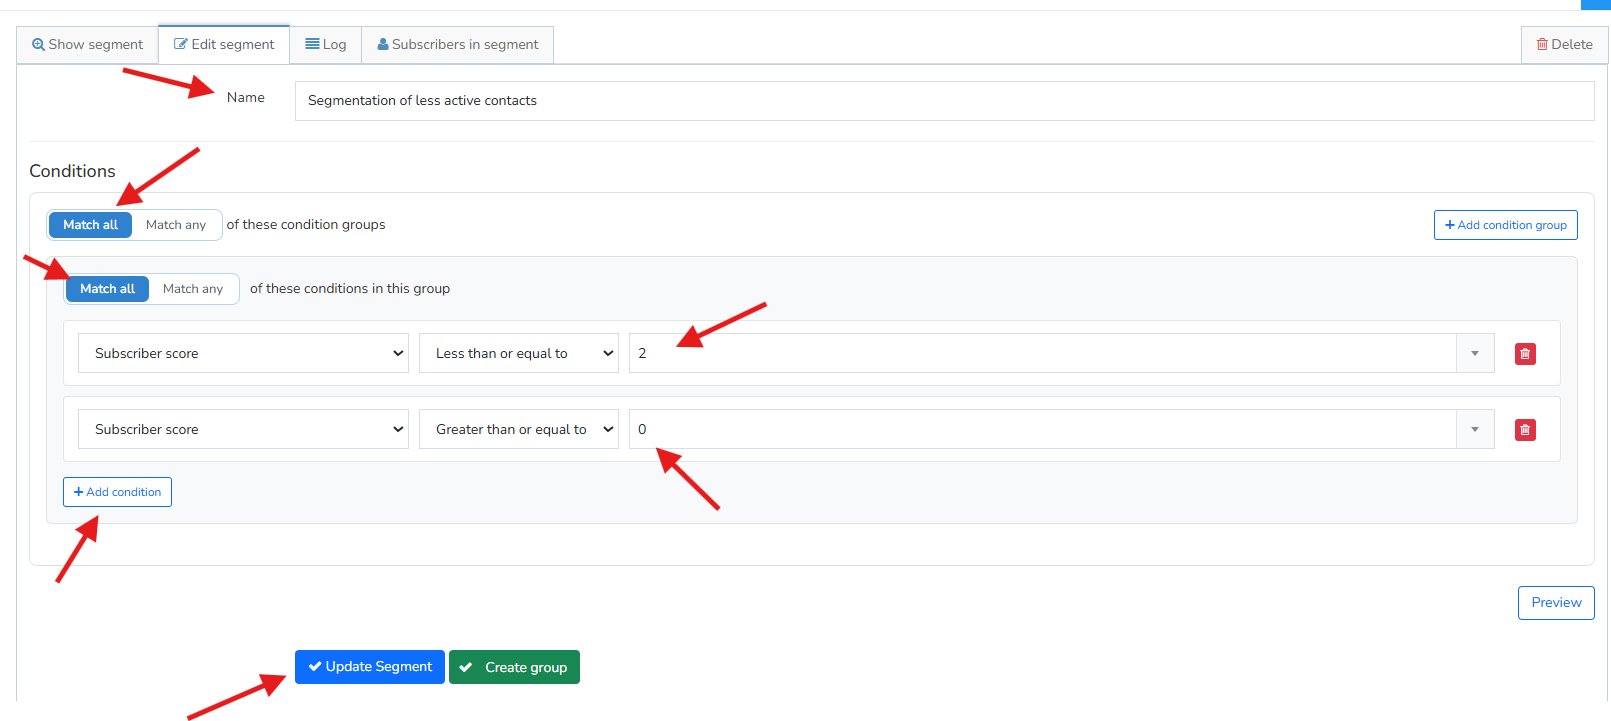
Now, enter a name for the segment (in Name). Next, under Conditions, select Subscribers must match all conditions below:, then click the +Add button twice to create the following two conditions:
- Subscriber reputation Less than or equal to 2.
- Subscriber reputation Greater than or equal to 0.
Finally, click Create segment. You will now have all subscribers with a reputation between 0 and 2 stars segmented.
Before proceeding with the automation, create a newsletter and send it to the subscribers in the segment you just created, as we will use the receipt of this newsletter as the trigger for the win-back automation.
Now we will create an automation to attempt to recover them and re-ignite their interest in your business, starting as soon as subscribers receive the newsletter.
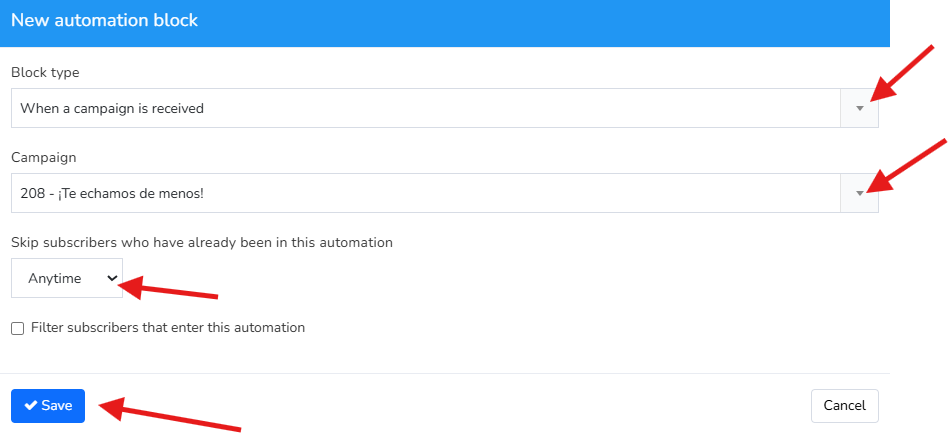
The first step is to select When a campaign is received in the Block type dropdown, then specify the name of the sent newsletter in Newsletter, and set Skip subscribers who have already been in this automation to Disabled. After that, click Save.
Next, we will configure a new email to be sent two days after receiving the We miss you! email. To do this, click Add and in the new automation block select: Wait in Block type, An amount of time in Wait, and set the wait time by entering 2 in Wait offset and days in Wait unit.
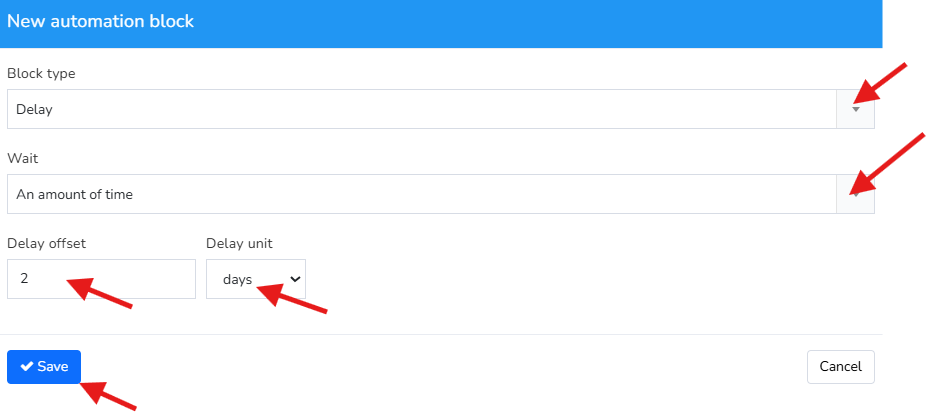
Once configured, click Save.
Now add the email you want to send automatically after those two days pass. Click Add and select Send email in the Block type dropdown, enter the subject for the email in Subject, and choose the sender in the Sender dropdown.
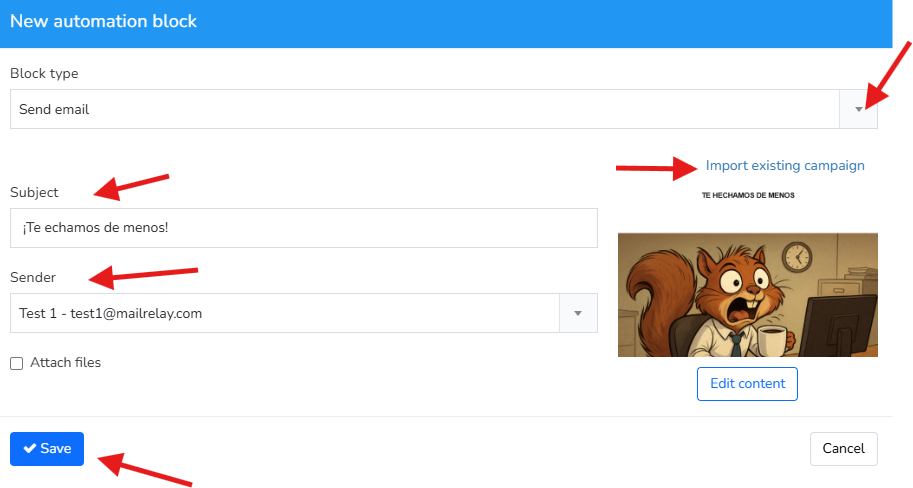
Next, select the design to send. Here, we will use a newsletter that has already been created, so click on Import existing campaign, select your pre-built design (in our case, we will use the newsletter We miss you!), and click Import.
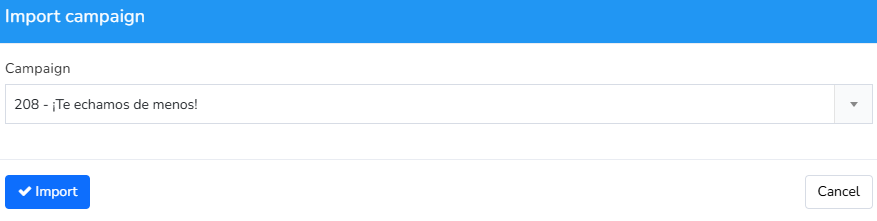
This returns you to the previous window. Click Save, and your automation setup is complete.
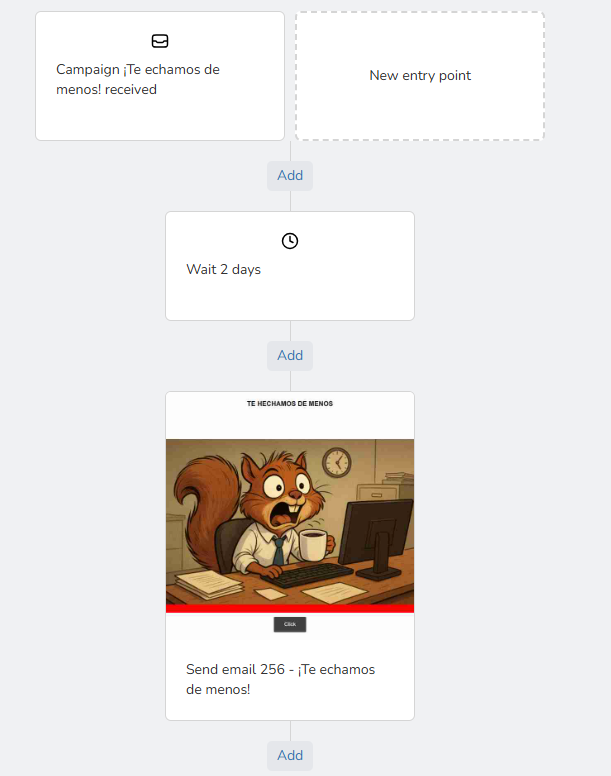
Could this start at a moment other than email receipt?
Yes, absolutely. There are many possibilities, such as starting when the email is opened, when a link is clicked, among other triggers. We used email receipt here to simplify the explanation, but the next example shows how to build workflows based on specific subscriber actions.
3.4.- Automations based on specific actions
As a next step, you can schedule an email send based on subscriber behavior, since how they interact with your mailings provides valuable data to guide your automated workflow.
3.4.1.- Have they opened the newsletter?
Using the sending of a newsletter as the entry point, we will build an automation that sends one newsletter to subscribers who opened the initial email and a different one to those who did not, introducing a 4-day wait period before sending either follow-up.
Important: You must insert a wait block at the beginning to give contacts enough time to take the action. Otherwise, the condition will always evaluate to false because contacts haven't had time to perform the triggering action.
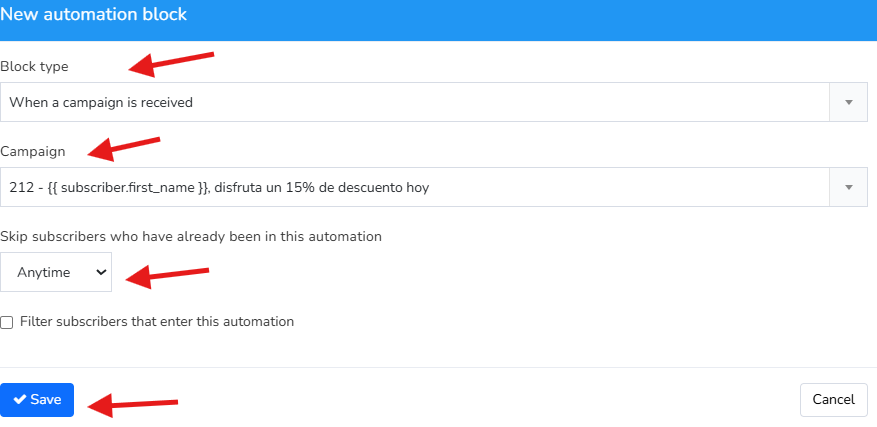
The first step is to select When a campaign is received in the Block type dropdown, choose the name of the sent newsletter under Newsletter, and set Skip subscribers who have already been in this automation to Any time. Finally, click Save.
Now click Add to insert a time delay block, giving subscribers time to open the email. In our example, we will allow 4 days. Select Wait in the Block type dropdown, choose An amount of time under Wait, and set the duration to 4 days (by selecting 4 in Wait offset and days in Wait unit).
Finally, click Save.
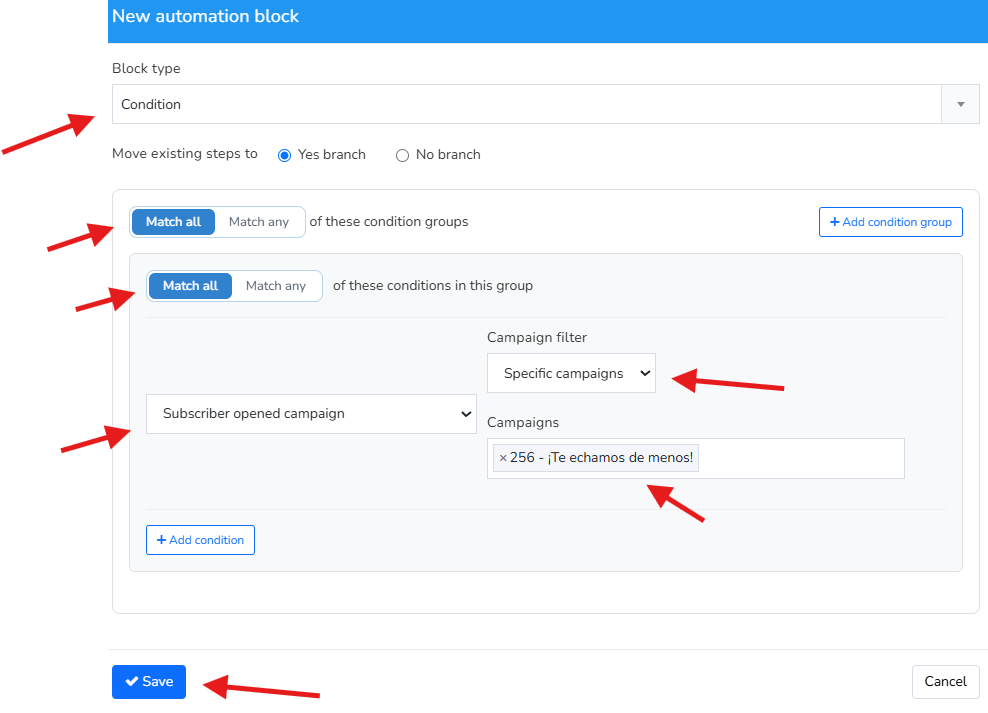
Next, we will branch into two paths: one for subscribers who opened the email, and another for those who did not. Click Add and select Condition in the Block type dropdown. Configure the condition as follows: Subscribers must match all conditions below:. Then set the condition to Subscriber has opened the newsletter, set Campaign filter to Specific campaigns, and under Newsletters choose the newsletter they need to open.
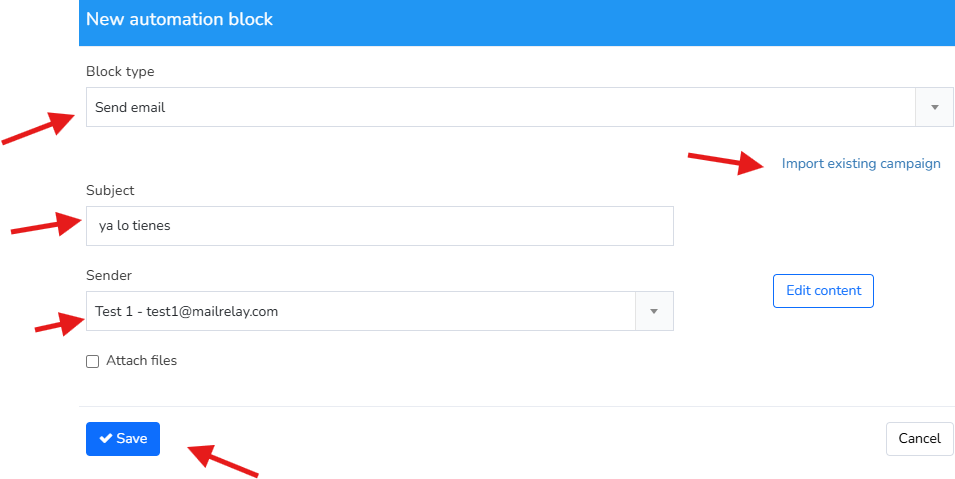
Now specify the email you want to send to users who opened the newsletter. Click Add on the green Yes path. Select Send email in the Block type dropdown, enter a subject line in Subject, and choose the sender in Sender.
Then choose the design by clicking Import existing campaign, select a pre-designed newsletter (we'll use You've got it for sure), and click Import. Returning to the main window, click Save to complete this branch.
Finally, configure the email path for subscribers who did not open the previous email. Click Add on the red No path. Select Send email in the Block type dropdown, enter your subject in Subject, and select your sender address in Sender.
Next, choose the design by clicking Import existing campaign, select a pre-created newsletter, and click Import. Back in the main window, click Save to finish.
This setup provides an automated email flow tailored to whether subscribers opened your previous email, sending targeted messaging to each group.
Was this article helpful?
That’s Great!
Thank you for your feedback
Sorry! We couldn't be helpful
Thank you for your feedback
Feedback sent
We appreciate your effort and will try to fix the article