What are transactional emails? SMTP and API options
Unlike mass mailings, transactional emails are sent to a single person. The goal is to communicate an important matter or an action that is required from, or triggered by, the user.
A well-known example is the transactional email with an order summary. These are very useful because they help us keep a record, in our possession, of the things we have purchased.
But there are many more:
- The sign-up confirmation email after subscribing
- Those that send account access details
- Or order status updates
They all contain relevant information for a specific user and must arrive immediately, at the right moment.
TABLE OF CONTENTS
- 1.- Is it possible to send transactional emails with a bulk email tool?
- 2.- Example case: using custom fields to send attachments
- 3.- Example case: using custom fields to send attachments via API
- 4.- Example case: using SMTP to send personalized emails with a URL to the attachment
- 5.- In summary
1.- Is it possible to send transactional emails with a bulk email tool?
Although bulk email tools such as Mailrelay are designed to send large volumes of emails to thousands of contacts, they sometimes also include tools for sending transactional emails.
1.1.- Transactional emails sent from the user interface itself
As we mentioned, email marketing tools are used to send large volumes, but there are situations where sending a transactional email is necessary.
For example:
- Subscription confirmation emails (double opt-in)
- Automation emails (in response to a subscription, on a birthday, when signing up to a new list, etc.)
- Even to confirm an unsubscription
All these emails are usually managed from the email marketing tool's own dashboard, which lets you edit them, schedule their delivery and keep a record of them.
Once they are set up, you won't need to do anything else, since the tool itself will take care of sending them at the right time.
What about other types of emails, such as purchase summaries?
In this case they are not sent from the platform itself, because there is no direct communication between the external tool and Mailrelay.
Even so, it is possible to use Mailrelay to send an online store's transactional emails.

1.2.- Transactional emails sent via SMTP
Nowadays most ecommerce platforms, such as:
- Prestashop
- Woocommerce
- Magento
Allow you to configure sending via SMTP.
These platforms normally use the server where they are hosted to send emails, with the usual limitations.
At first, when your ecommerce store is “fresh out of the oven”, you most likely won't notice anything or run into any problems.
However, as your store's sales volume grows and it handles more emails, you will very likely hit the limits imposed by hosting services.
Keep in mind that a lot of emails may be sent:
- Purchase summary
- Changes in the order status
- Possible errors or modifications
- Promotions of related products
- Etc.
All of this has to be sent constantly, every day.
And there comes a point where the hosting service can't handle it.
In that case, you can easily configure Mailrelay's SMTP so that these emails are sent from the email marketing tool instead of the hosting.
This is an immediate solution for sending all these transactional emails from an efficient sending platform.
1.3.- Transactional emails sent via API
The last option for sending transactional emails with Mailrelay is using the development API. It is an effective alternative for use with apps, CRMs and similar software, integrating them with Mailrelay to send transactional emails in a wide variety of situations:
- When the user performs a specific action
- Based on certain conditions (usage time, preferences)
- As a confirmation or reminder of an event
- Etc.
These are very diverse actions and therefore difficult to manage from a conventional email marketing application. Having an API that lets you connect both tools is the best option.

2.- Example case: using custom fields to send attachments
Below we'll look at an example of sending a mass mailing with attached files. Each attachment will be unique to each contact.
It is not advisable to attach files directly to the email because:
- It makes emails more likely to be marked as spam
- And it increases the size of the email and its sending costs
For this reason, we'll look at a very effective alternative that will let us avoid those problems.
It consists of hosting the attachments in an external location and including a download link in the mailing.
2.1.- The first step is to create a custom field
From the Subscribers>>Custom fields menu and the Add button:
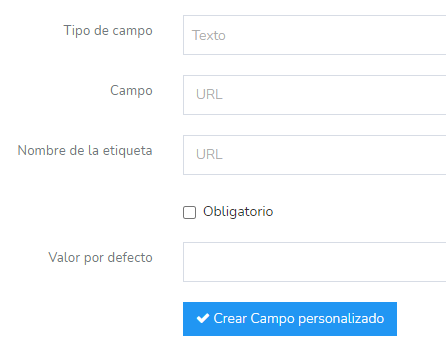
We choose the “text” field type because this is where the URLs will go.
For the field name and label we enter “URL”, and we can leave the rest of the fields empty if we wish.
2.2.- Next, we add the field to a newsletter
How can we add this URL field to an email? Like this:
{{ subscriber.custom_fields.URL }}At the time of sending, this tag will be replaced by the content of the custom field.
To add it to a link, we would do it like this:
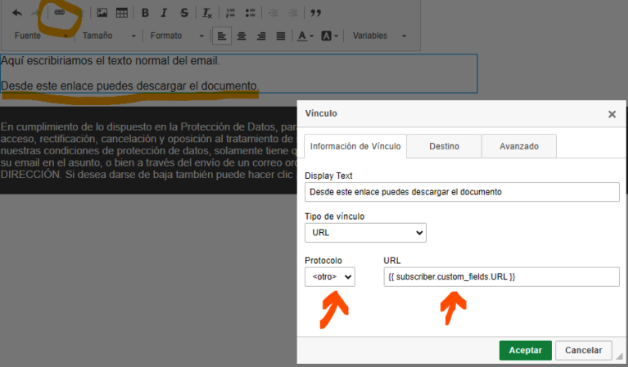
As you can see, you only need to select the text you want to link and click the chain icon in the editor. Then, in the URL box, add the tag mentioned above.
IMPORTANT: this depends on whether you upload the URLs with the protocol (https://, for example) or not. If you upload them with the protocol, choose “other” in the box; otherwise, choose the appropriate one.
2.3.- Importing the contacts' data
The last remaining step would be to import the contacts with their URL data. The CSV could look like this, for example:

In this case there would be 3 comma-separated fields
- The email
- The name
- And the URL. In this case, note that it includes the https:// protocol at the beginning
Once you have the file, you can go to the Subscribers>>Imports>>New import menu. The next step will let you choose the fields and match them with the appropriate columns:
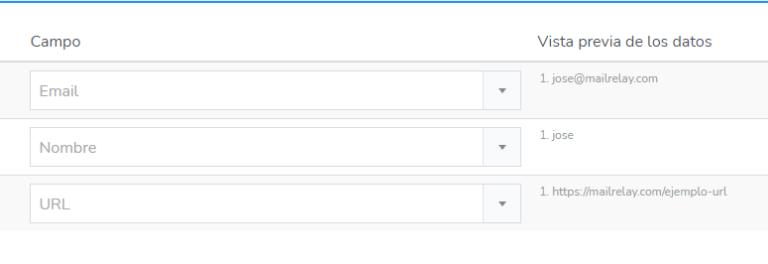
This way you can import as many contacts as you want, each with its corresponding URL. At the time of sending, the system will replace the tag with each contact's corresponding URL, so they will be able to access the file without any problems.

3.- Example case: using custom fields to send attachments via API
Another option for sending mass emails with attachments is to use the development API included in Mailrelay accounts.
To enable it, go to the Settings>>API keys menu and click the Add button. This will generate an API Token, which will be required for all API calls and requests.
3.1- How can you access the API documentation?
On the screen where you enable the API keys, there is a link to access the documentation:

On the screen that link takes you to, you'll find all the API documentation:
- All available methods and calls, documented
- Available parameters, error and success messages
- Code examples in various programming languages
- You can even make real requests from the documentation page itself
The first step would be the same in this case
3.2.- Creating custom fields via API
To do this we'll use the Custom fields – post method:
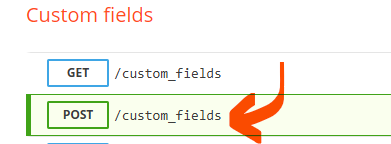
For example, we could fill it in like this:
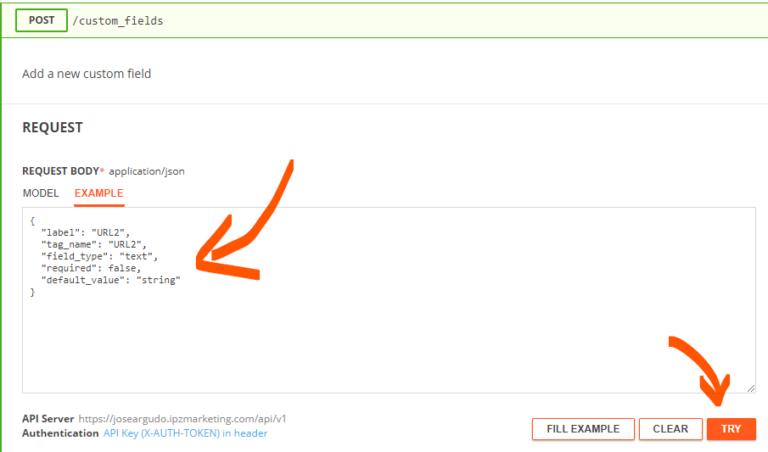
The values we are entering are the same as those we saw in the example case in section 2; the only difference is that in this case we've named the custom field URL2, simply so that it doesn't clash with the one from the example case in section 2.
Running this code with the TRY button will return the following message:
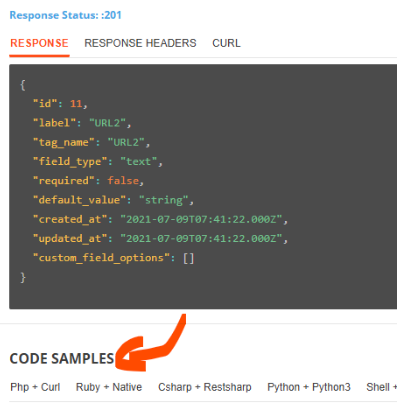
Also note that a little further down there is a code examples section. This option is always available for all methods documented in the API.
3.3.- Importing contacts via the API
Once the custom fields have been created, it's time to import the contacts, which we can also do via the API:
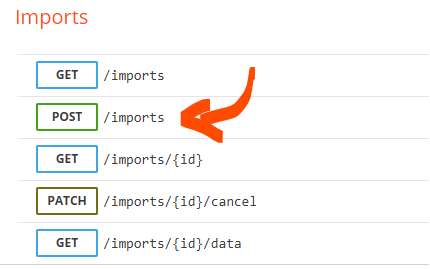
The method we'll use is Imports – Post /imports. Here you can see an example for this file:

The content of this CSV file must be encoded in base64:
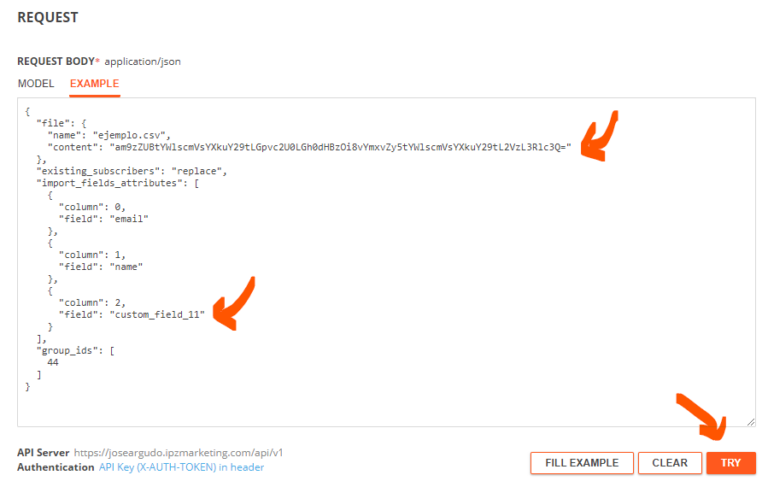
You can see the different values required for the import:
- The file name and its content, encoded in base64
- Which column contains the email
- Which column contains the name
- Which column contains the custom field: custom_field_id. The id will be that of the custom field
- And the group the contacts will be imported into
3.4.- Creating the mailing with the custom field
Finally, all that remains is to prepare the mailing so that it uses the custom field:
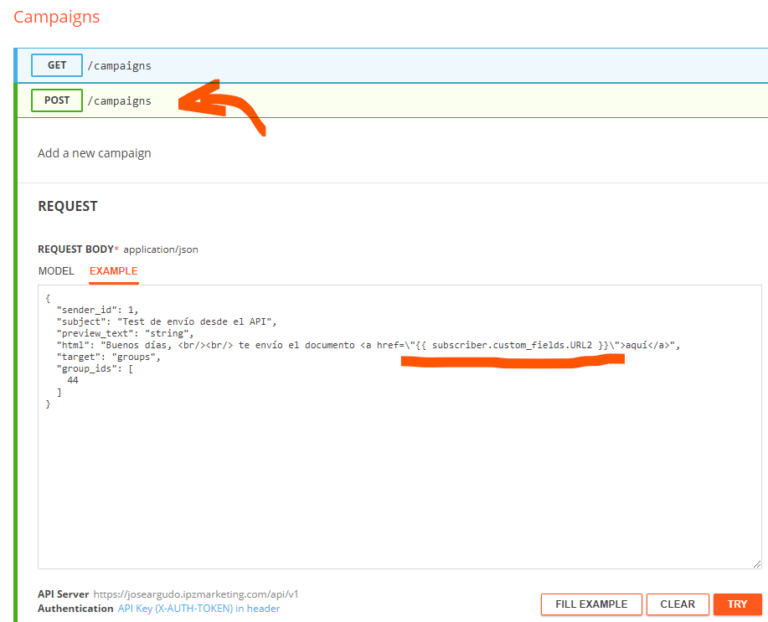
To create the newsletter, you only need to use the Campaigns – Post / campaigns method with the following values:
- The sender id
- The subject
- The HTML content, making sure to escape special characters.
- And the group or segment it will be sent to.
And finally, to send it we would use the following method:
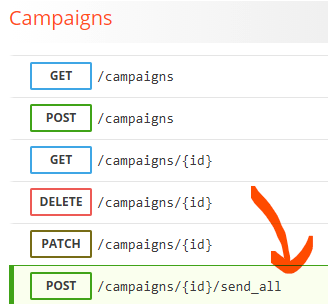
With that, the mailing would be sent, replacing the custom field with its value for each contact.

4.- Example case: using SMTP to send personalized emails with a URL to the attachment
This last option is perhaps one of the simplest. It also lets you send a fully personalized email to each contact, without needing to use custom variables.
In principle, all Mailrelay accounts include an SMTP server. To enable it, just go to the Settings>>SMTP settings menu and click the corresponding button.
IMPORTANT: to be able to enable SMTP, all the senders in your account must have their SPF record configured correctly.
When you enable SMTP, the system will show you:
- The host
- Port
- Username
- Password
- Enable tracking: we'll talk about this later
- Recipients.csv: this option lets you send all the recipients in an attachment, so the entire mass mailing is done by sending a single email. This option doesn't apply to the case we're discussing now, so you can leave it disabled.
RECOMMENDED: if you forget the password, you can generate a new one, since it is only shown in the panel when you enable SMTP.
4.1.- Once SMTP is enabled
You'll be able to see some code examples for using it:
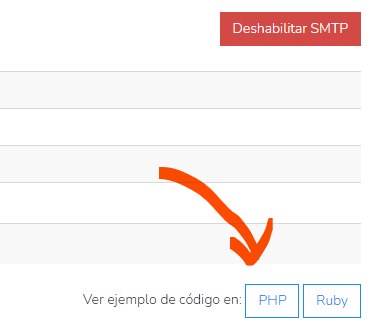
For PHP, it uses the popular PHPMailer library, which you can download for free.
As I mentioned earlier, the good thing about using SMTP is that you can send a different message to each contact (Body):

This way, each contact can directly receive the right URL to download their corresponding attachment. If you also need to get statistics, it's very easy
4.2.- Enabling statistics for SMTP sends
The first step is to enable SMTP tracking in the Settings>>SMTP settings menu.
Once you've done that, for each send you'll need to add a tag like this one to the email subject:
[X-MR-Tags: 01]
Don't worry, the tag won't be visible. The system uses it to prepare each email you send via SMTP so that it has open and link click tracking.
This tag:
- Must go at the beginning of the subject, as the very first thing
- You can only modify the 01; everything else must stay the same
- Don't include spaces: for example, [X-MR-Tags: mailingOctober] is correct, while [X-MR-Tags: mailing October ] would not be
4.3.- Reviewing SMTP statistics
Once you send emails with SMTP tracking enabled and the corresponding tag, you'll be able to access the statistics in the Reports>>SMTP emails menu.
In the upper right area you'll see a button labeled Report:
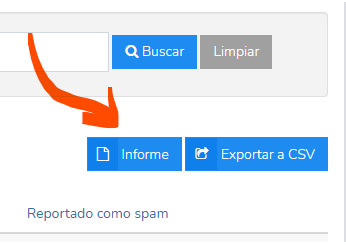
That button will take you to the detailed SMTP sending report. At the top you'll find the filtering options, including the tags we mentioned:

The filtering options are:
- Start date
- End date
- Group by
- SMTP tags
This will give you statistics on:
- Emails sent
- Opens (views)
- Clicks
In fact, Mailrelay is the only tool that offers statistics for emails sent via SMTP.
5.- In summary
Transactional emails are more common than we might think at first, which is why Mailrelay offers several options for sending them:
- From the application dashboard
- Via SMTP server
- Using the development API
As a result, you have a wide range of options for managing transactional emails in any situation.
Was this article helpful?
That’s Great!
Thank you for your feedback
Sorry! We couldn't be helpful
Thank you for your feedback
Feedback sent
We appreciate your effort and will try to fix the article