Subscriber segmentation in Mailrelay: how to create dynamic segments
Subscriber segmentation lets you send each campaign only to the contacts most likely to respond to it. With Mailrelay segments you can filter your list by subscriber data (country, language, group, tags…) or by what they have done with your emails (opens, clicks, campaigns received). The result is more relevant email marketing campaigns, more opens and clicks, and a better sending reputation.
In this guide you will learn what a segment is, how to create one step by step, how to combine conditions, and three ready-to-use examples.
Table of contents
- 1. What is a segment and how is it different from a group?
- 2. How to create a segment step by step
- 3. Match all or Match any: how to combine conditions
- 4. Available condition types
- 5. Most commonly used segments
- 6. Preview and save: Create Segment or Create group
- 7. Frequently asked questions about segmentation
1. What is a segment and how is it different from a group?
A segment is a set of subscribers who meet the conditions you define. It is dynamic: if a contact stops meeting the conditions, they automatically leave the segment, and if another contact starts meeting them, they join it.
A group, on the other hand, is static: it always contains the same contacts until you change it, even if their behavior changes.
| Segment | Group | |
|---|---|---|
| Type | Dynamic | Static |
| Updates automatically | Yes, based on its conditions | No, until you change it |
| How it is created | By defining conditions | By importing contacts, adding them manually or saving a segmentation as a group |
| Best for | Recurring campaigns, re-engagement, behavior-based sends | Fixed lists, a snapshot of your contacts at a given moment |
2. How to create a segment step by step
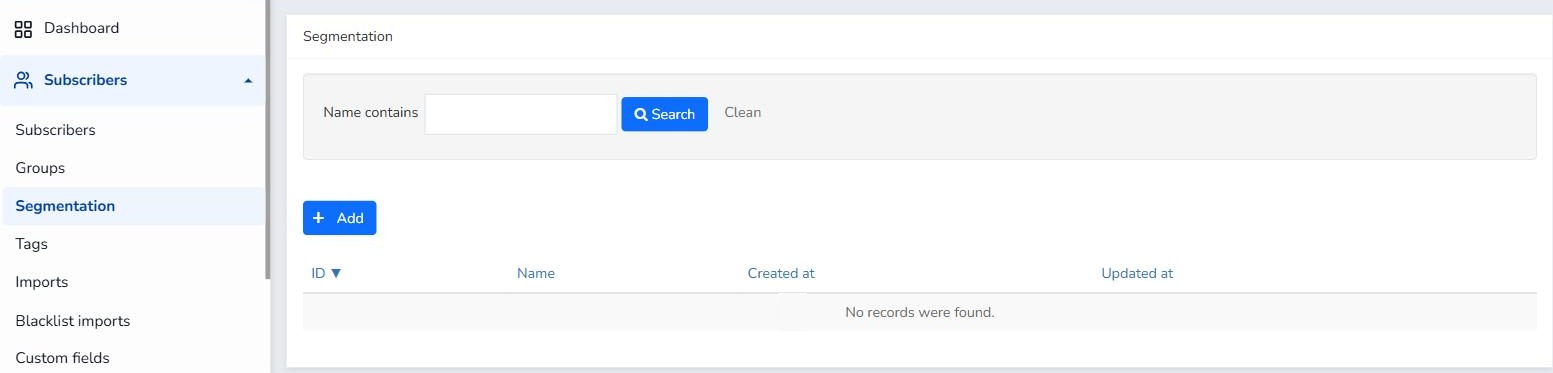
- Go to Subscribers > Segmentation. Here you will see the segments you have already created and you can search them by name.
- Click Add.
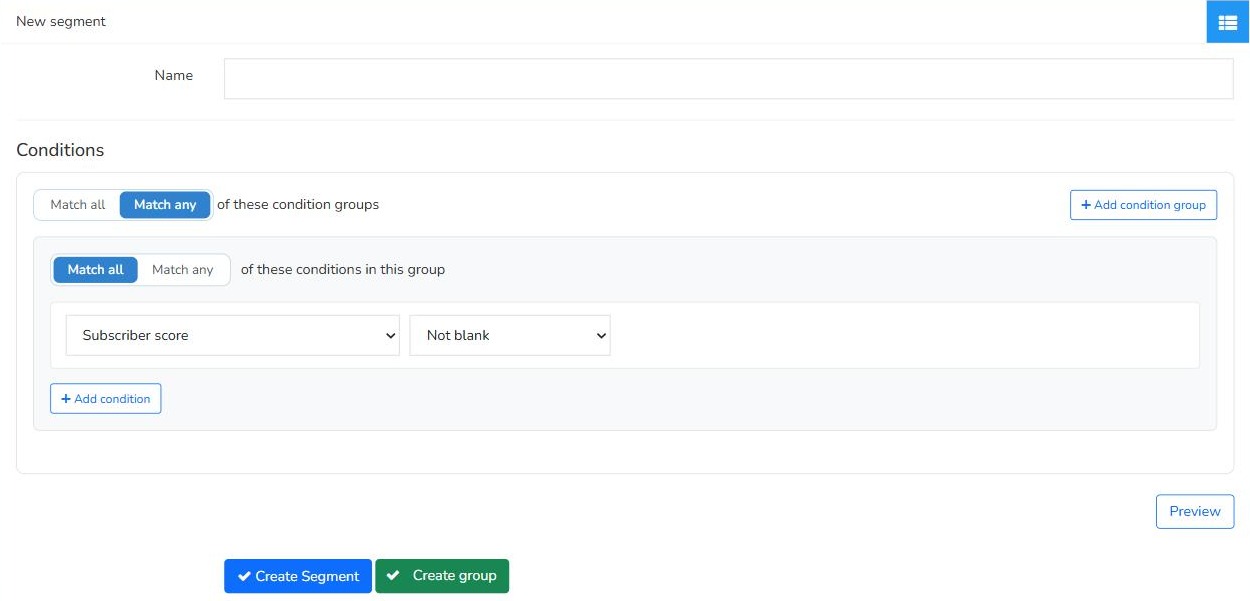
- Enter a Name for the segment. Only you will see it, so use a descriptive name, for example Inactive in the last 90 days.
- Under Conditions, choose what subscribers must meet. By default you will see one condition group with one condition, which you can change from the drop-down menu.
- Add more conditions with Add condition or more groups with Add condition group.
- Click Preview to check which subscribers meet the conditions and then click Create Segment.
3. Match all or Match any: how to combine conditions
A segment is organized on two levels:
- Conditions: each individual filter (for example, Subscriber country equal to Spain).
- Condition groups: blocks that contain one or more conditions.
At each level you can choose how they are combined:
| Option | Equivalent to | The subscriber is included if… |
|---|---|---|
| Match all | AND | They meet all the conditions (or all the groups). |
| Match any | OR | They meet at least one of the conditions (or one of the groups). |
- The option at the top (… of these condition groups) sets how the groups are combined with each other.
- The option inside each group (… of these conditions in this group) sets how the conditions in that group are combined.
By default, groups are combined with Match any and the conditions within each group with Match all. If you only use one condition group, the option at the top does not change the result.
To delete a condition, click the red trash icon to its right. To delete an entire group, click Remove group.
4. Available condition types
Conditions are organized into four categories:
| Category | Conditions |
|---|---|
| Subscriber | Score, age, creation date, update date, belongs or doesn't belong to group, subscriber without group, email, name, city, state, country, locale, SMS phone, WhatsApp phone and tags. |
| Campaign | Clicked or didn't click, opened or didn't open, received or didn't receive the campaign. |
| General activity | Clicked at URL, click city, state or country, and impression city, state or country. |
| SMS campaign | Received or didn't receive the SMS campaign. |
Depending on the condition you choose, new options appear to complete it:
- Subscriber data conditions: an operator (Equal, Not equal, Contains, Doesn't contains, Blank, Not blank, Before, After…) and the value you are looking for.
- Campaign conditions: a Campaign filter (Any campaign or Specific campaigns) and a Time interval (Any, Specific, Minutes ago, Hours ago or Days ago).
5. Most commonly used segments
5.1 Subscribers who did not open a specific campaign
This is useful for resending a campaign to those who did not open it, for example with a different subject line.
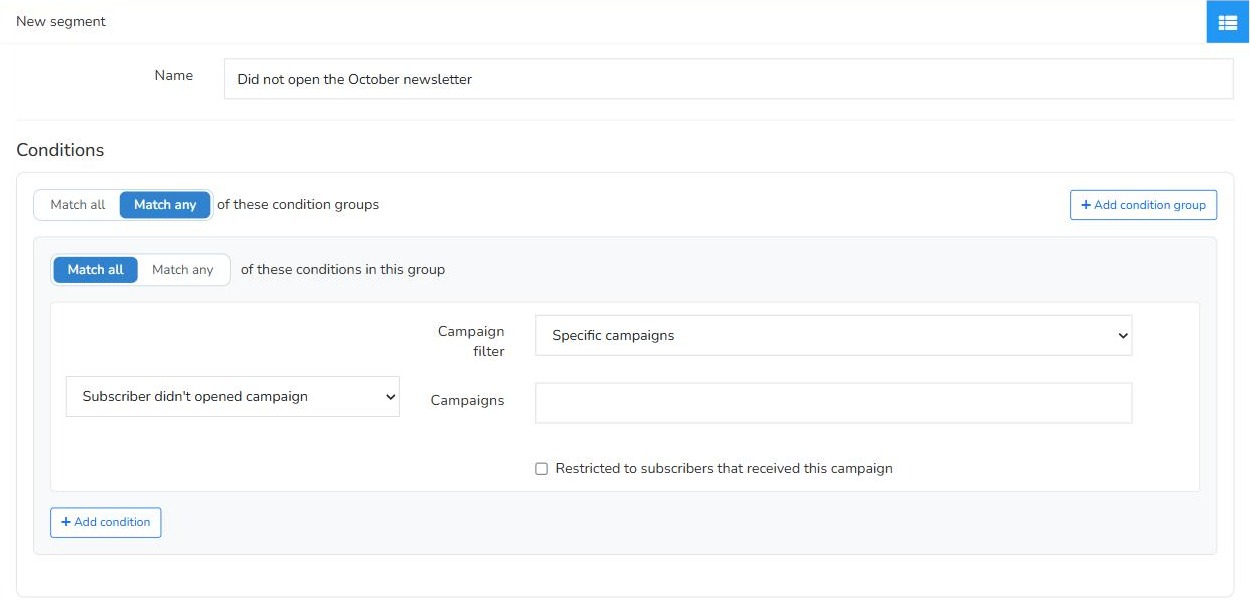
- Go to Subscribers > Segmentation > Add and enter a name, for example Did not open the October newsletter.
- In the condition, select Subscriber didn't opened campaign.
- In Campaign filter, leave Specific campaigns.
- In Campaigns, search for and select the campaign you want.
- If you only want to include those who received that campaign, check Restricted to subscribers that received this campaign.
5.2 Subscribers inactive in the last 90 days
Identifying inactive subscribers lets you run a re-engagement campaign or clean your list, which improves your deliverability.
- Go to Subscribers > Segmentation > Add and enter a name, for example Inactive in the last 90 days.
- In the condition, select Subscriber didn't opened campaign.
- In Campaign filter, select Any campaign.
- In Time interval, select Days ago.
- In Relative time, enter 90.
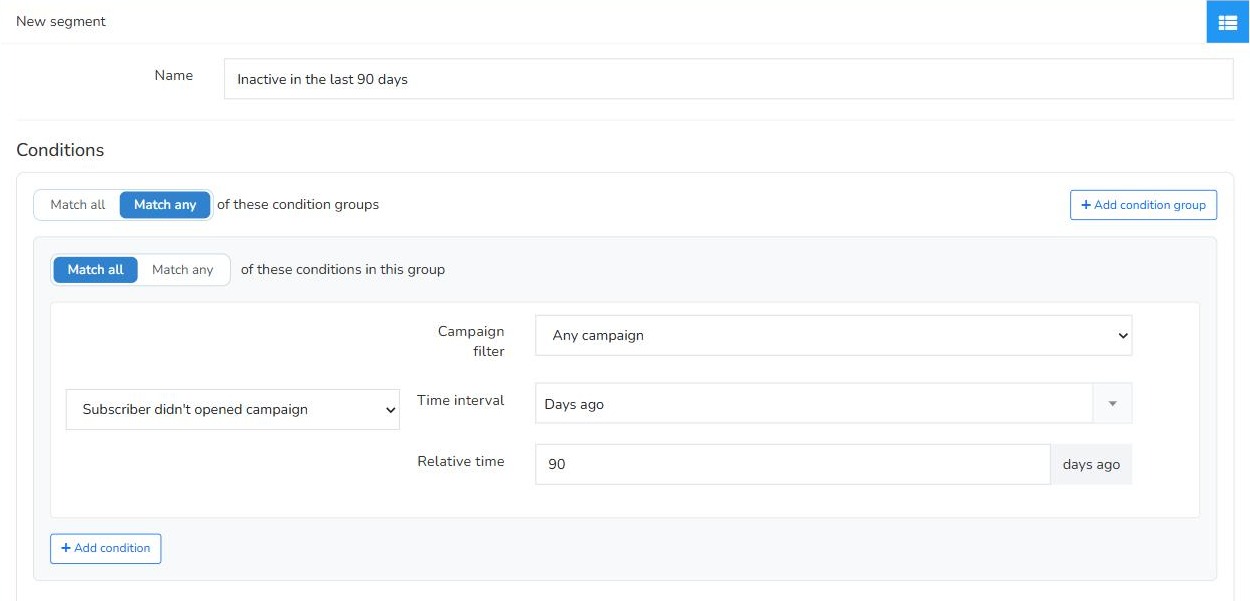
Because the interval is relative (days ago), the segment updates itself every day. You don't need to change any dates.
5.3 Combining condition groups: country and recent opens
This example selects subscribers from Spain or Mexico who also opened a campaign in the last 30 days.
- At the top, in … of these condition groups, select Match all: the subscriber must meet both groups.
- First group, with Match any: Subscriber country equal to Spain OR Subscriber country equal to Mexico.
- Click Add condition group.
- Second group, with Match all: Subscriber opened campaign, with Any campaign, Days ago and 30.
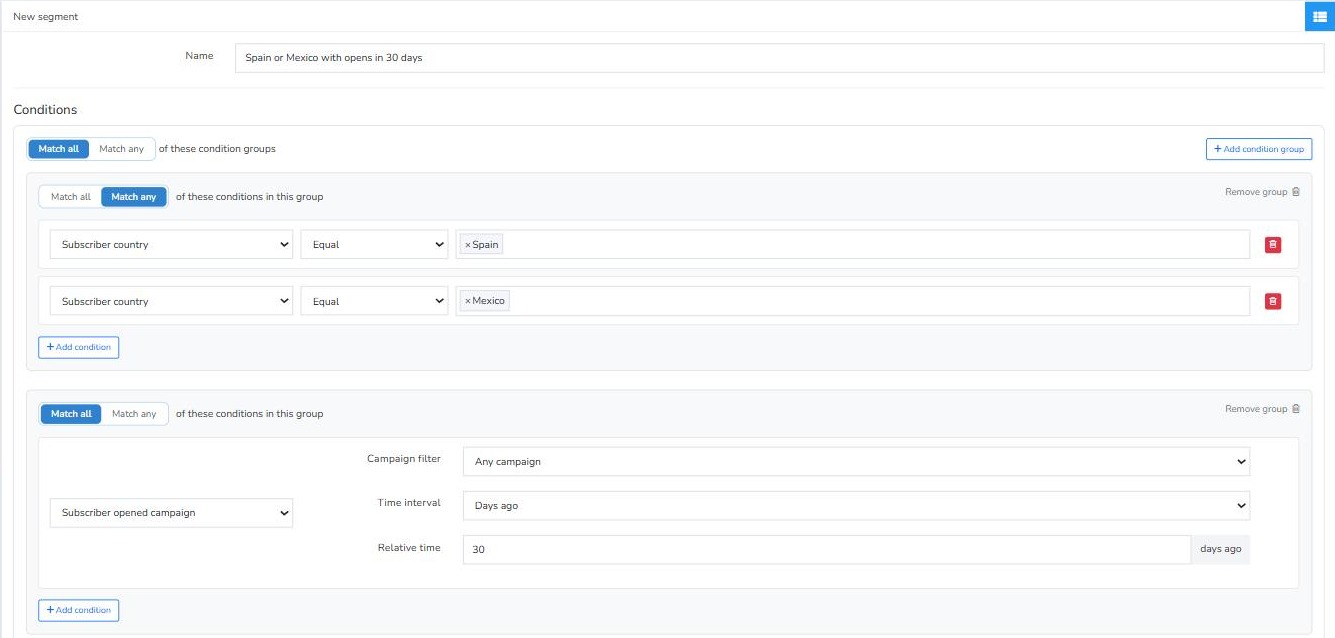
The result is: (Spain OR Mexico) AND opened a campaign in the last 30 days.
Tip: in the Subscriber country condition you can also select several countries in the same field, without adding one condition per country.
6. Preview and save: Create Segment or Create group
Before saving, click Preview. The subscribers who meet the conditions will appear below (or a notice if there are none), so you can check that the segment is set up correctly.

Then choose how to save it:
- Create Segment: saves a dynamic segmentation. If a contact stops meeting the conditions (for example, opens the campaign), they automatically leave the segment.
- Create group: saves the subscribers who meet the conditions right now as a static group. They will stay in the group even if their behavior changes later.
Once created, you can select the segment or group as recipients when you create a newsletter.
7. Frequently asked questions about segmentation
Does a segment update automatically?
Yes. Segments are dynamic: every time you use one, it includes the subscribers who meet the conditions at that moment.
Can I turn a segmentation into a group?
Yes. Set up the conditions and, instead of Create Segment, click Create group. A group will be created with the subscribers who meet the conditions at that moment.
Why doesn't the preview show any subscribers?
It means no contact meets all the conditions at once. Check whether you used Match all where you meant Match any, and review the values of each condition. If you don't have any contacts yet, first import your subscribers.
Was this article helpful?
That’s Great!
Thank you for your feedback
Sorry! We couldn't be helpful
Thank you for your feedback
Feedback sent
We appreciate your effort and will try to fix the article