Create a newsletter with the visual editor
With Mailrelay's advanced editor, you can easily create effective and engaging newsletters for any audience.
Thanks to its customization options, you can have a newsletter ready to send to your contacts in no time, requiring only a few minutes to tailor it to your specific needs.
You can also benefit from AI-powered newsletters that are customized to your requirements and save you time on the design process.
INDEX
- 1. Getting Started
- 2. Content
- 3. The Newsletter Editor
- 4 - Newsletter Customization
- 4.1 - Adding and Editing Text
- 4.2 - Adding an image
- 4.3 - Adding a Link
- 4.4 - Adding Buttons
- 4.5 - Adding a Divider
- 4.6 - Adding a Separator
- 4.7 - Add a Navigation Bar
- 4.8 - Adding Social Media
- 4.9 - Adding the First Visual Block
- 4.10 - Adding a Video
- 4.11 - Adding an unsubscribe link
- 4.12 - Adding a Product List
- 4.13 - Adding a QR Code
- 4.14 - Adding a Countdown Timer
- 4.15.- Add a table
- 4.16 - Adding a Link to the Web Version
- 4.17 - Using Multiple Columns
1. Getting Started
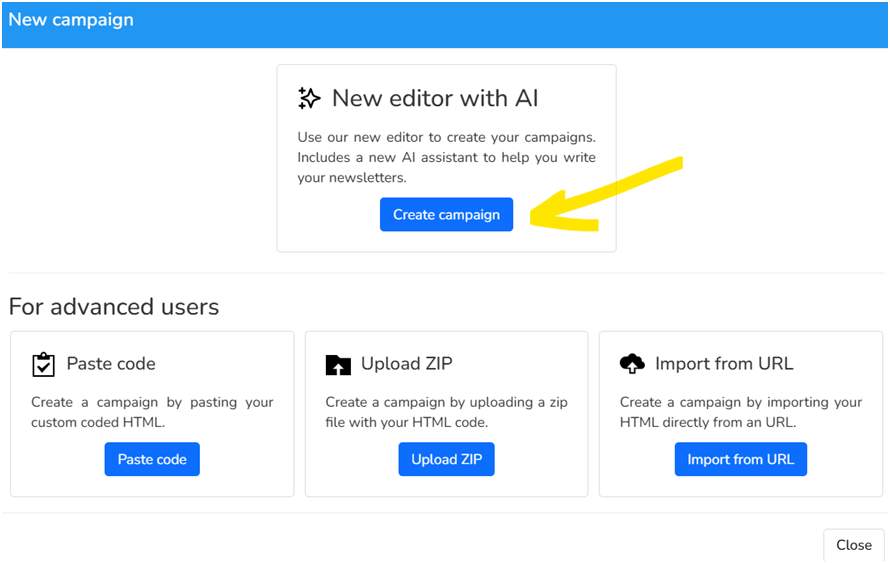
The first thing you should do is go to Campaigns >> Campaigns and click on +Add. This will bring up several options for creating newsletters. Locate the New editor with AI option and click on Create Campaign.
We'll cover the options shown in the Advanced Users section in another article.
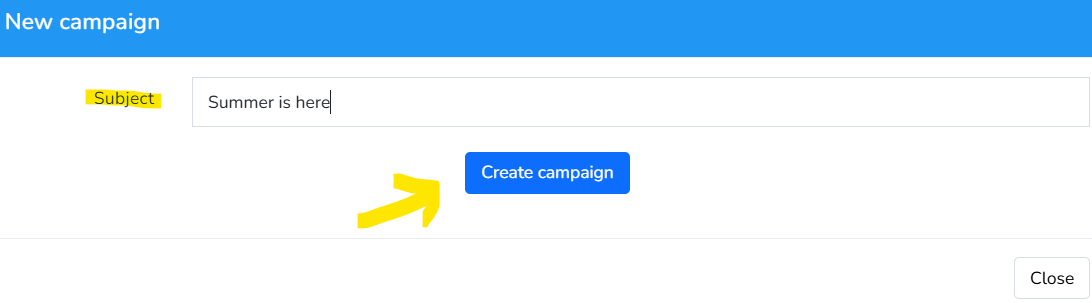
After that, a new window will appear where you must name the newsletter in the Subject option and click on Create newsletter.
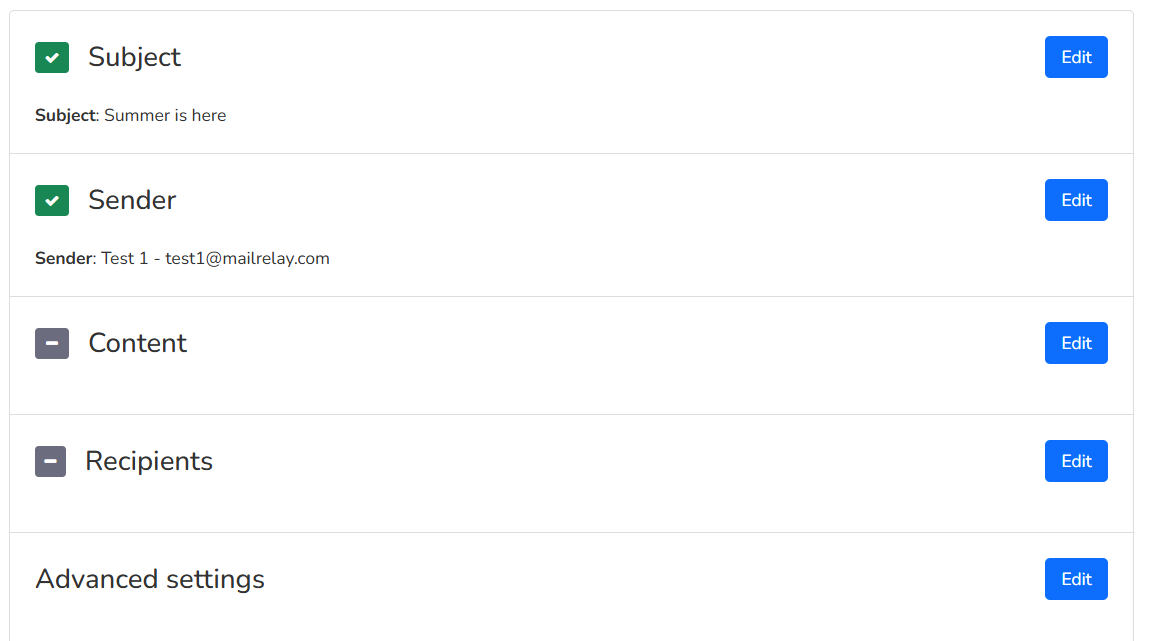
The window with the following configurable options will now appear: Subject, Sender, Content, Recipients and Advanced Settings.
1.1 - Subject
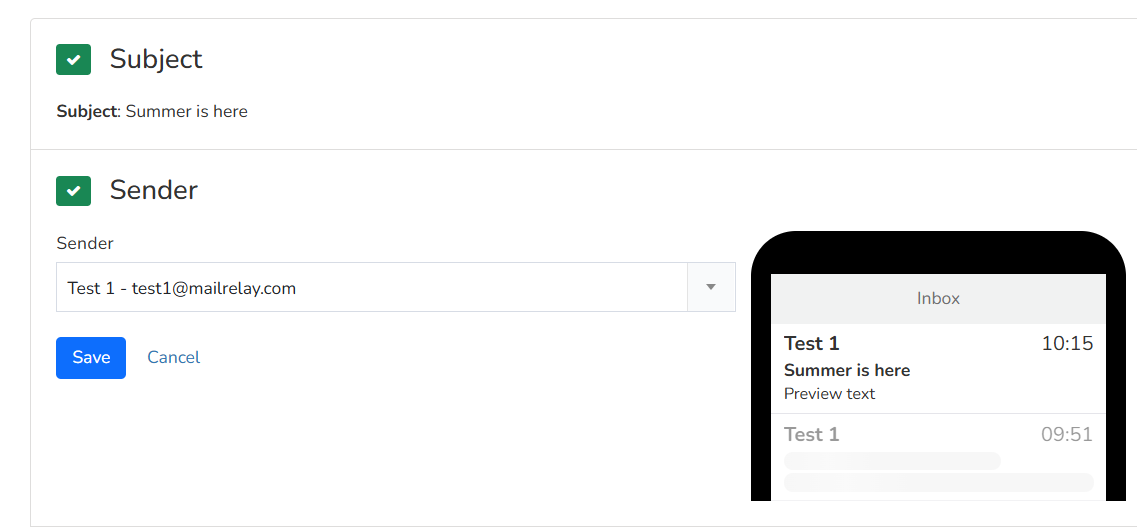
By default, the Subject field is automatically filled with the name you entered in the previous step. You can edit it if needed by clicking the blue Edit button in that area.
This opens the area to configure the following:
Subject: To change the newsletter subject, simply click on the current subject and edit it.
Preview Text: Here, if desired, you can add a preview phrase for the newsletter, which will be displayed by most email clients just below the subject.
You can add variables to the subject by clicking on "Add variables" You can add the subscriber's first name, last name, etc. custom fields
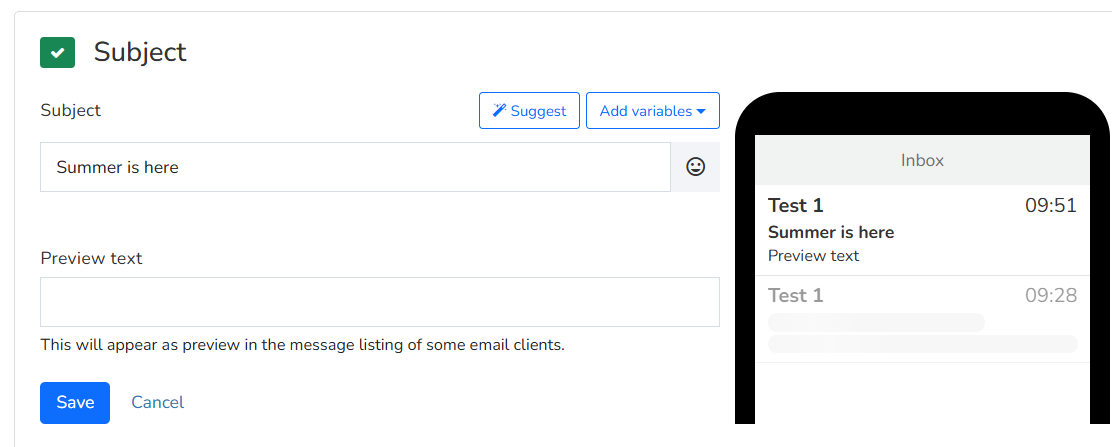
Once everything is ready, click Save to save your changes.
IMPORTANT: You can also use Mailrelay's AI to effortlessly create effective subject lines. To do this, click the Suggest button. This will open a window where, with the help of AI and by selecting various parameters such as tone, content, and keywords, several subject lines will be created according to your preferences. You can then use them if you like.
1.2 - Sender
As with the Subject option, this field is automatically filled with the sender configured by default in the system. If you don't like it, you can change it by clicking Edit in that area.
This opens the area where you can select any of the senders you have previously confirmed. To do this, click on the drop-down menu and, after selecting another sender, click Save.
1.3 - Content
This option, Content, allows you to create the desired design for your newsletter, and therefore is the one we will focus on so you can get the most out of your email marketing and create a design that aligns with your strategy and the objectives you wish to achieve.
This is explained in detail in point number 2 of this article.
1.4 - Recipients
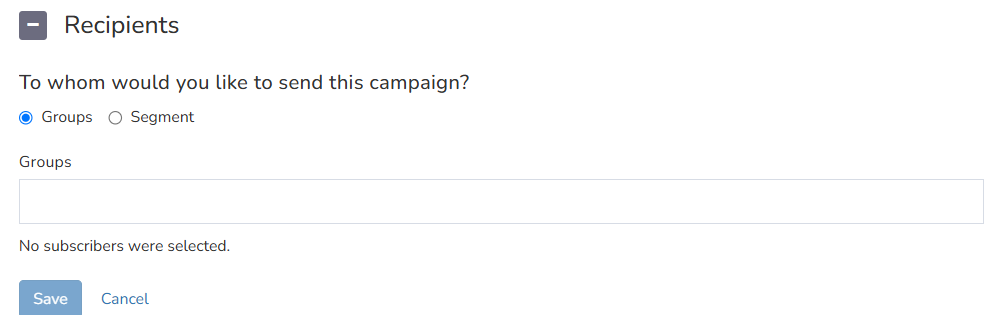
This is where you specify the subscribers you want to send the newsletter to. Click Edit to access simple options for selecting recipients. In the "Who would you like to send this campaign to?" section, you can select two options: Groups and Segments. Selecting Groups will open a dropdown menu for you to choose the desired group(s). Similarly, selecting Segments will open a dropdown menu for you to specify the segment(s) to which you want to send the newsletter.
To save your changes, simply click Save
1.5 - Advanced Settings
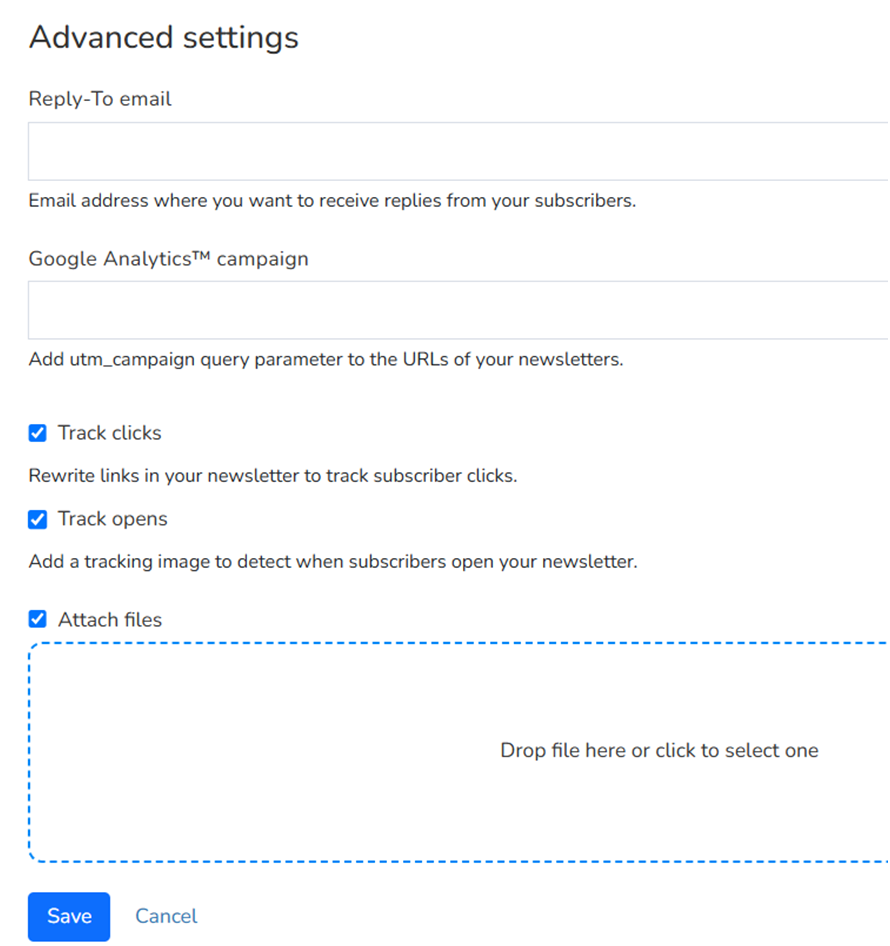
Here you have access to customize various aspects of the newsletter: such as defining the email address to which your subscribers will reply (Reply to option), adding the utm_campaign from your Google Analytics campaigns to measure the results of your Analytics campaign (Google Analytics campaign option), and adding attachments to the newsletter. To do this, you must check the Attach files box (this allows you to drag the document to be attached to the attachment area; you can also click in this area to locate the attachment on your disk and upload it). You can also configure newsletters to be sent without tracking.
In the newsletter's advanced settings, you'll see two options that you can manage separately:
- Track clicks: This allows you to obtain statistics on clicks on the links in your newsletter.
- Track opens: This allows you to obtain information on who opens your newsletters.
By disabling these options, Mailrelay will not collect these statistics when you send that newsletter (as long as you maintain this setting).
To save your changes, simply click Save.
If for any reason you cannot continue with the newsletter creation process, simply click on Finish later (at the top right of the window) to save a draft of the work you have done so far and you can resume the process later, with the adjustments you have already made.
2. Content
As we already mentioned, we will explain in detail how to add and customize the content of our newsletter designs. It all starts by clicking the Edit button.

This will lead us to our first decision, as it will display a window where we can either start with one of the system's predefined templates or use the system's AI to generate a custom template.
To begin with a template from the available options, navigate through the different categories in the left-hand menu and then, in the center, hover your mouse over one of them to reveal the Select button. Clicking this button will load the template directly so you can start using it.
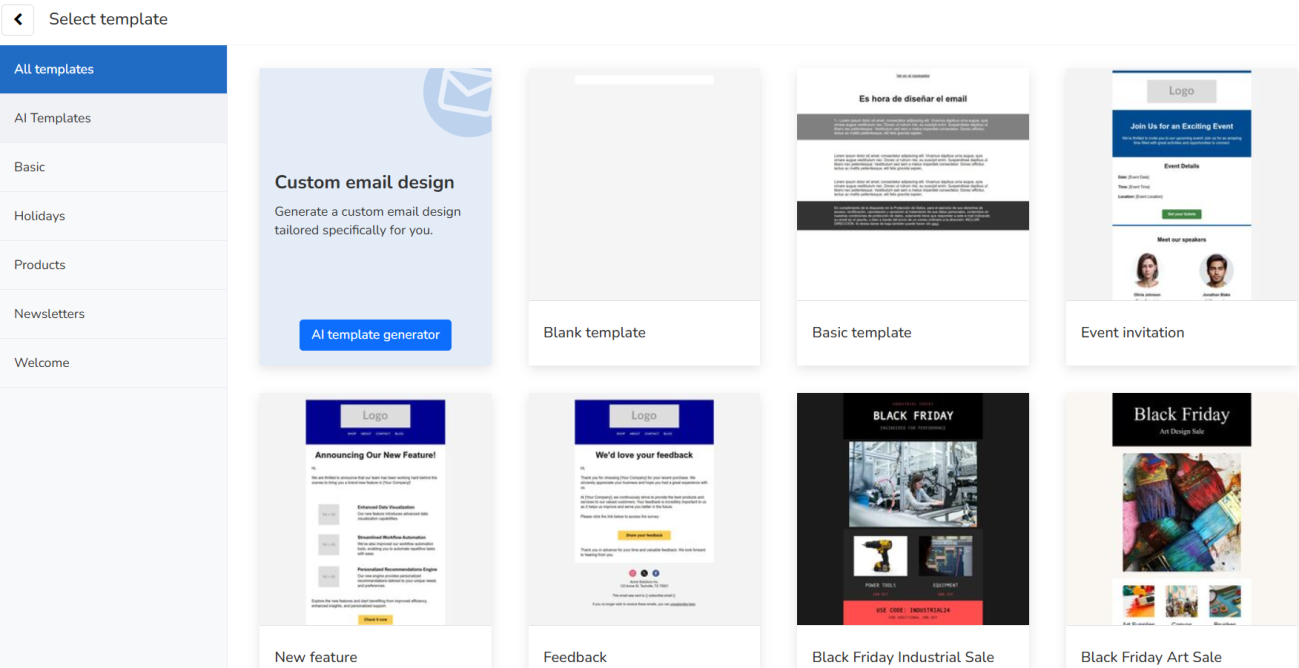
To use AI and generate a new newsletter, press the AI Template Generator button and it will take you to the AI newsletter creation wizard.
The AI-powered template generator will ask you for some simple information to generate a custom design in just a few seconds. The options you need to specify to design with the help of AI are:
- Website URL: Enter the web address from which you want the AI to gather the information to create your newsletter content.
- Content Instructions: Detail the instructions you want the AI to follow when creating the design. This is where you provide the AI's prompt.
- Tone: Select the design tone from the following options to achieve the desired result: Natural, Formal, Informal, or Professional.
- Language: Select the content language from the available options: English, Spanish, Brazilian Portuguese, French, Galician, Catalan, Basque, and Italian.
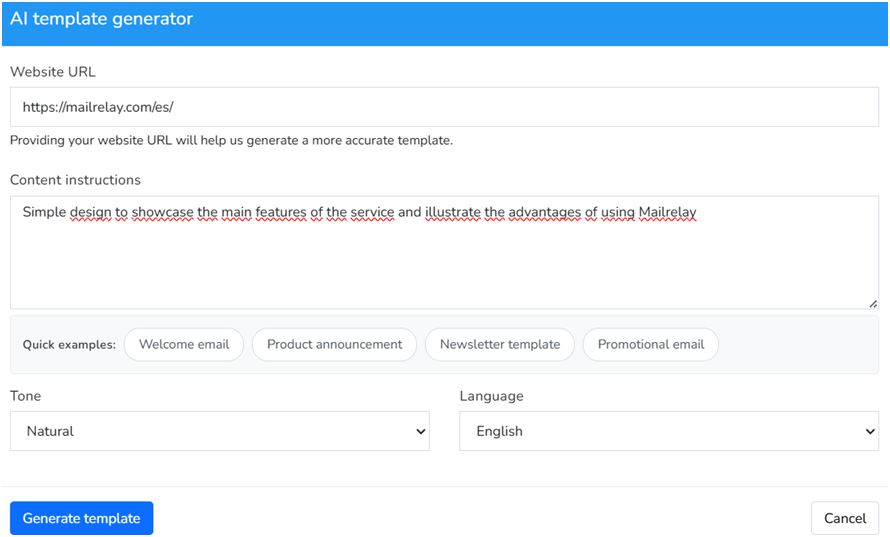
Once everything is to our liking, simply click the Generate Template button, and in a few seconds, we'll have our first custom template ready to use. With the data we provided to the AI in this example, the result was as follows (we just need to adapt it, and then it will be ready to send):
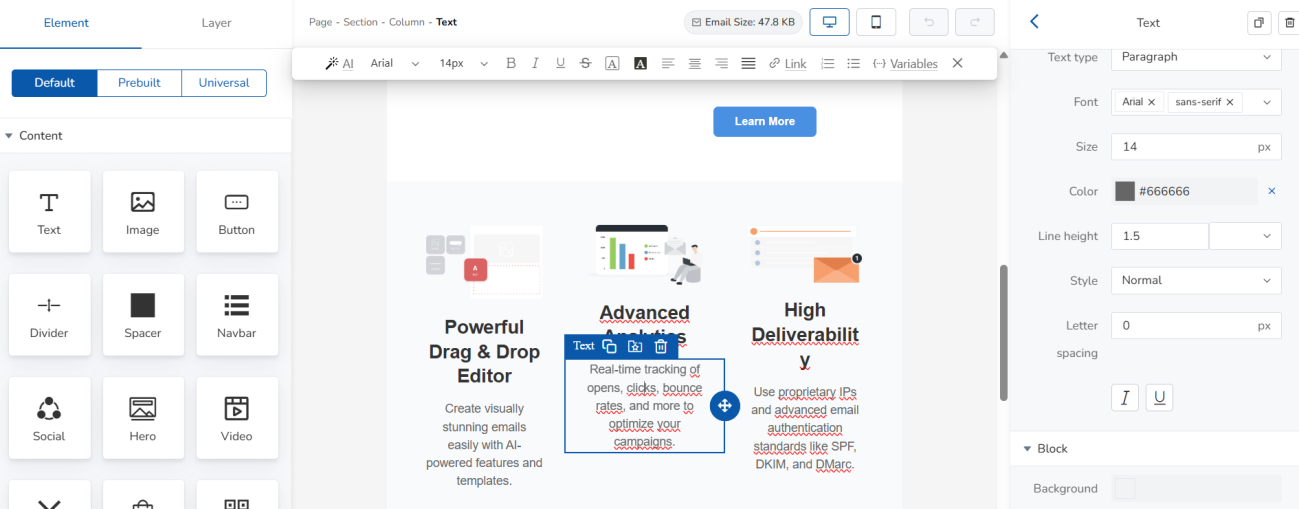
3. The Newsletter Editor
In the open editor, we can make as many adjustments as we want to ensure the design is exactly as we envision it.
The interface has three main areas to work in: the content and design area, the display area and the settings area.
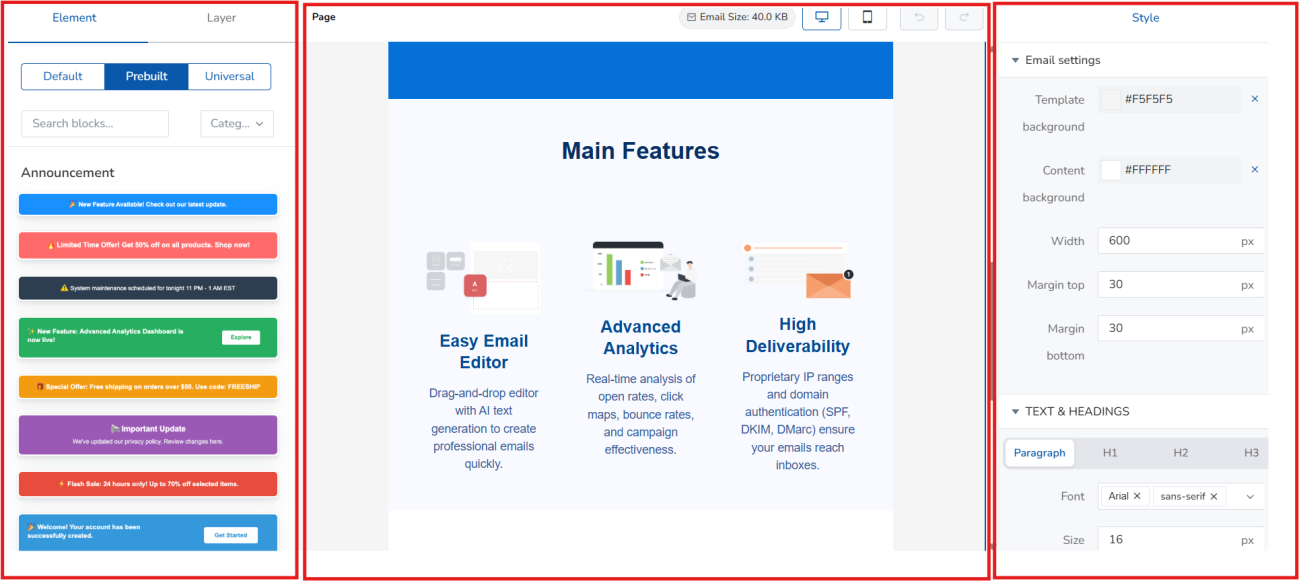
3.1 - Content and Design Area
This is the area where you have access to the various elements you can incorporate into your designs. Simply drag and drop them into the preview area, and you can define the number of columns you want to use.
It also offers pre-designed blocks to create CTAs, ads, product showcases, and more in just a few seconds (Prebuilt button). You can also save custom favorite blocks ready to be dragged onto any design (Universal button).
For example, you have access to text boxes, dividers, buttons, reusable blocks, and more.
3.2 - Preview Area
As the name suggests, this is the area where you can see the newsletter's appearance at all times and adjust how it will look. Since it's a drag-and-drop editor, you can easily change the layout of the different elements.
3.3 - Configuration Area
This is the most important area of the editor, as it defines the newsletter's behavior and how users can interact with it. It's where you can, for example, include links, define element dimensions, font types, and more.
4 - Newsletter Customization
The customization options are extensive, so we'll show you the most commonly used ones, as well as some actions that will allow you to add a distinctive touch to your design. But first, let's look at some common features for all elements.
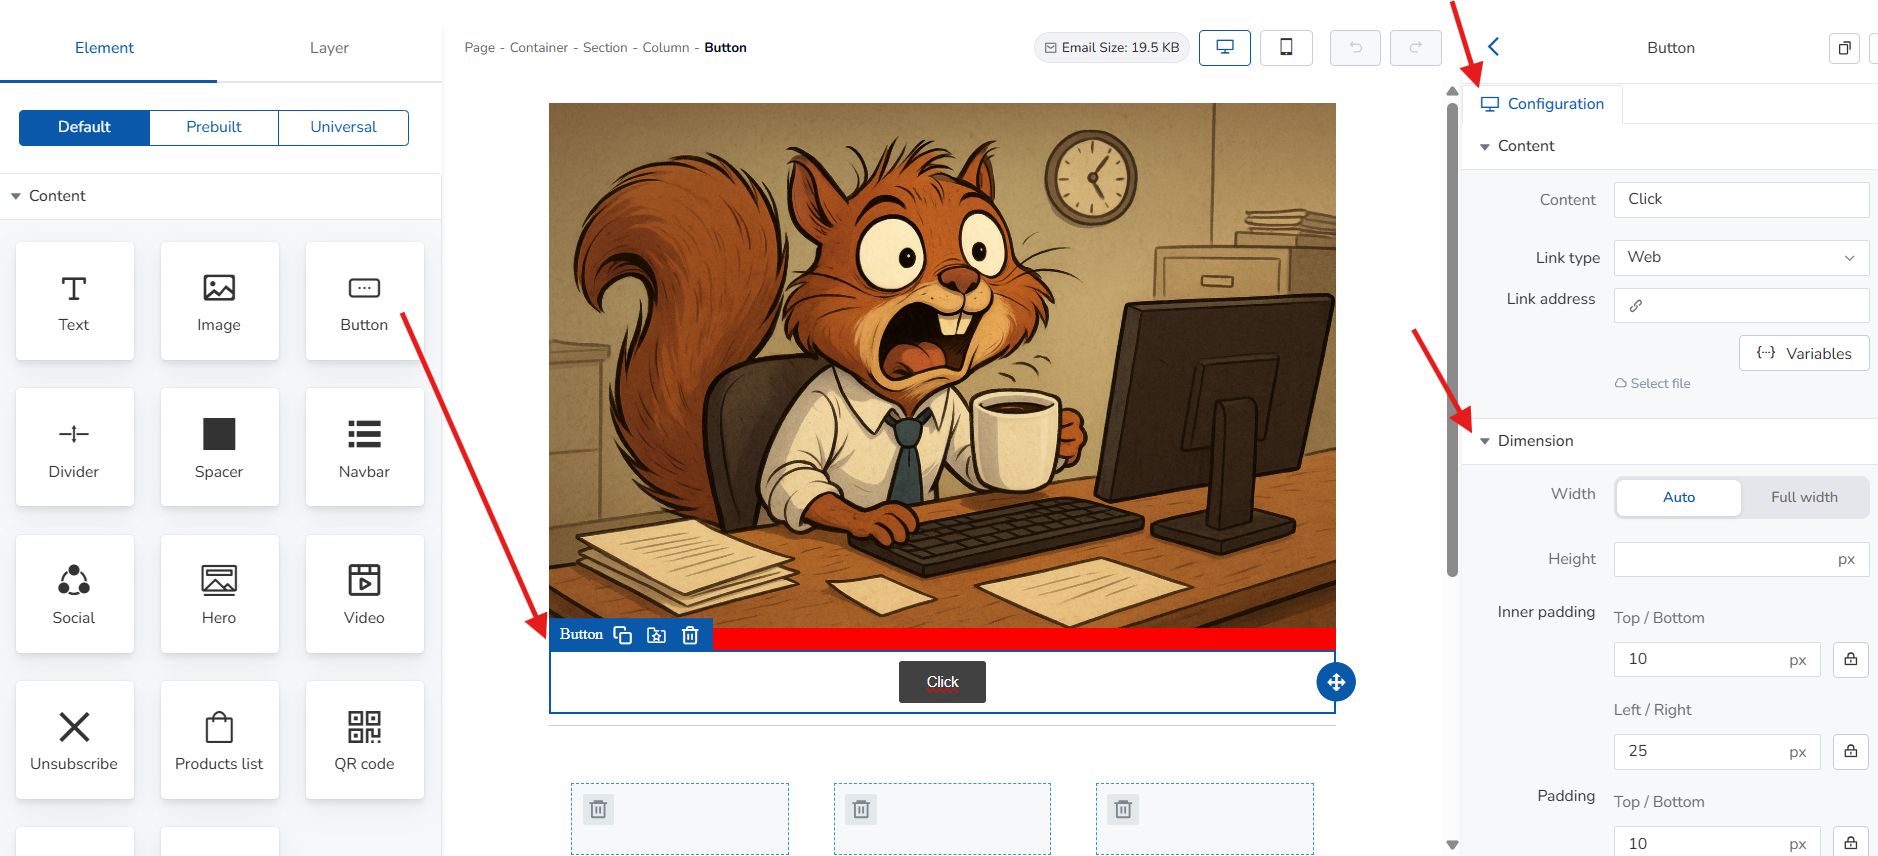
Once an element reaches the display area, simply click on it to highlight it in a box. There you'll see its name along with options to duplicate, delete, and move it. Let's look at two examples: a button and an image.
- Click on a button, text, or image, you will see text indicating what type of element it is (button), for example, you can duplicate it (two squares icon), create a universal element (container of universal reusable elements), delete it (trash can icon) or move it to another place with the mouse (cross icon).

4.1 - Adding and Editing Text
To do this, drag the Text icon with your mouse and place it in the area where you want to add text. Now delete the default text in the text box and add your own. Similarly, in the Settings area, you can define various aspects such as: setting the text box height and padding (Dimension option); modifying the font size, line height, spacing, and defining a color (Typography option); and defining alignment, background color (Block option), etc.
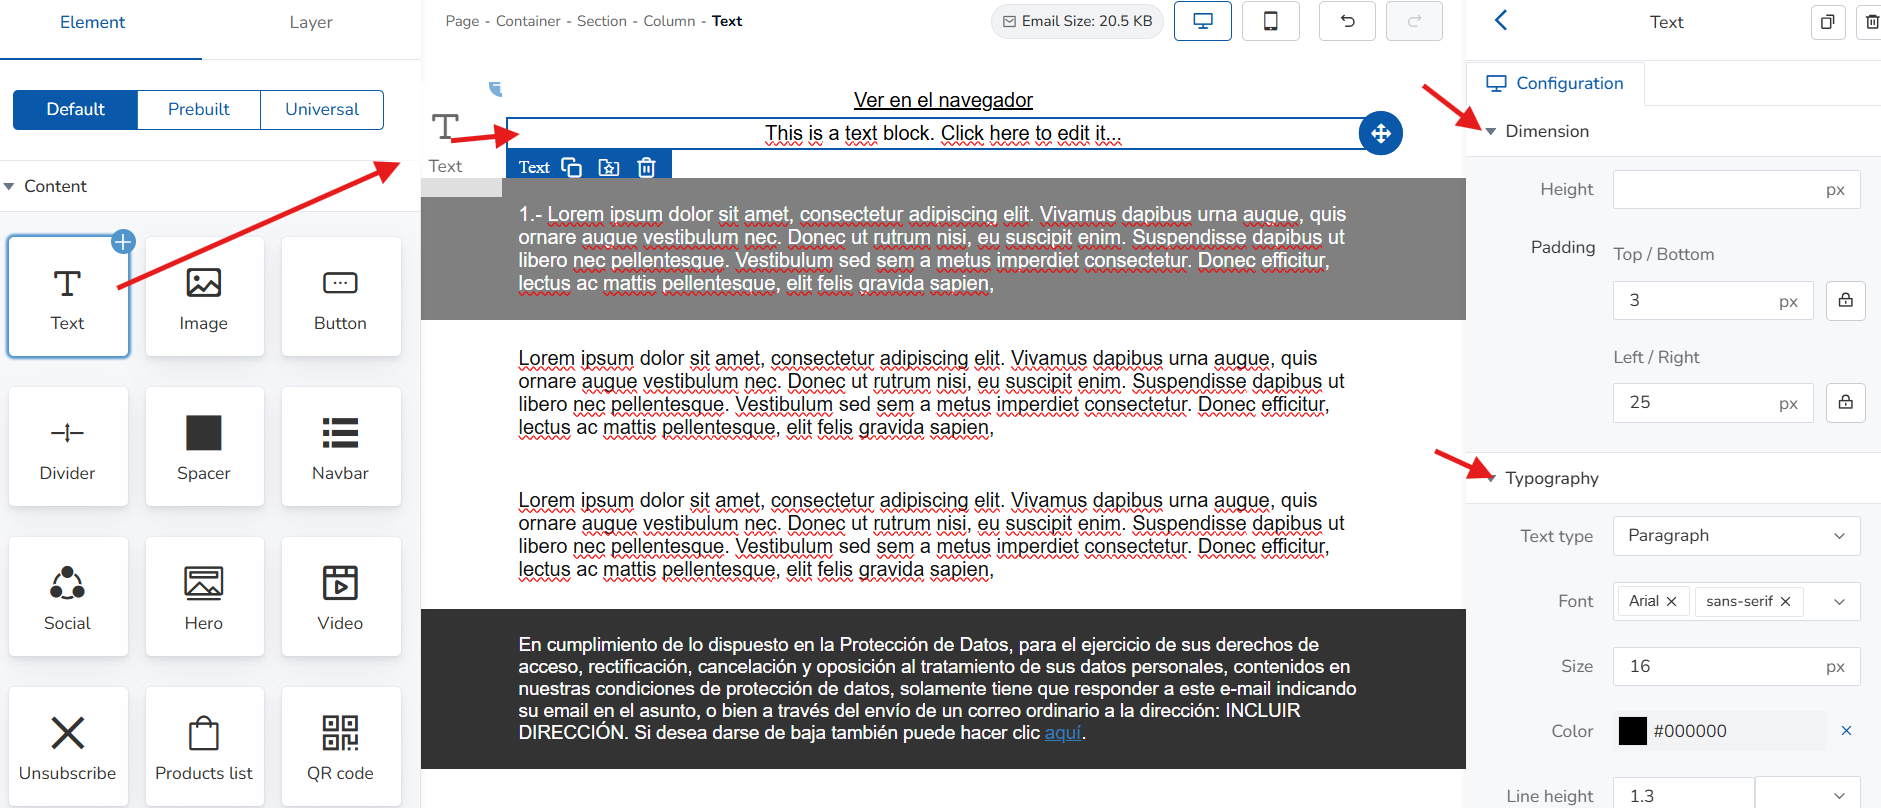
4.2 - Adding an image
To add an image, drag the Image icon with your mouse and place it in the area where you want the image to appear.
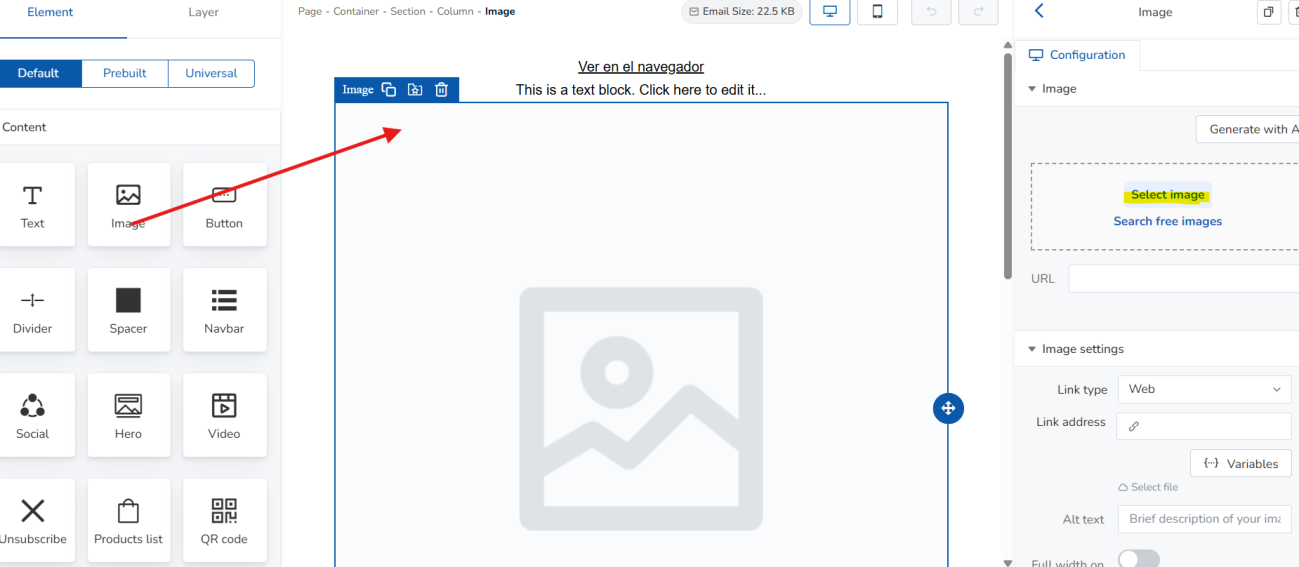
Now, in the Settings area, locate the Image option and click Select image to use an image from your image repository (where you can choose one you've already uploaded or upload new ones from the Drag and drop area or click here to select it). Alternatively, click Search free images.
You can also select an image directly from a public URL by pasting the address into the URL field.
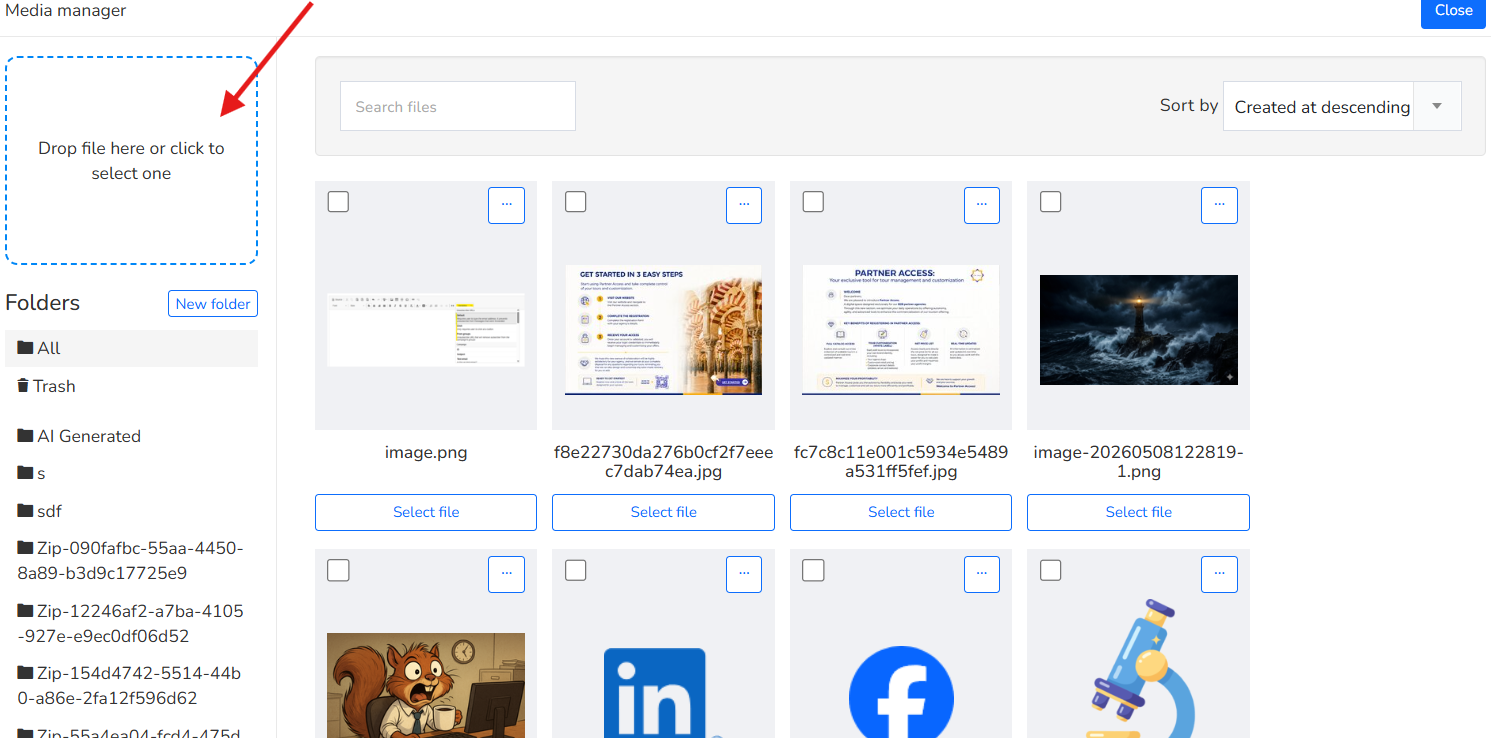
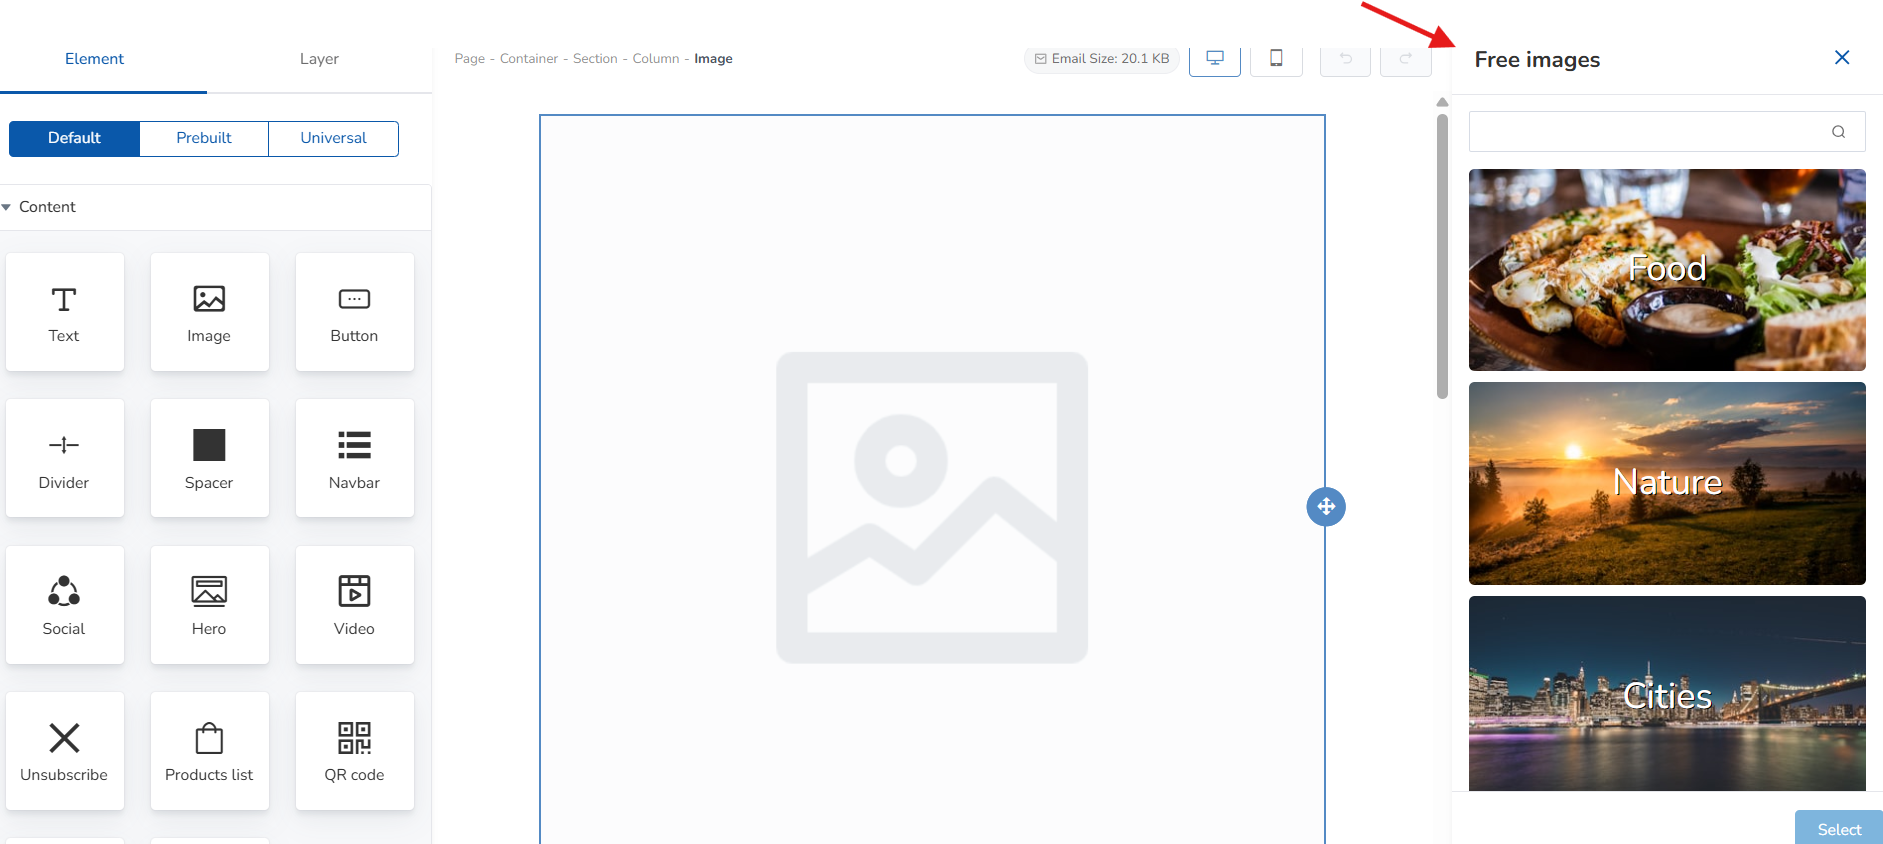
Similarly, in the Settings area, you can define multiple aspects such as: adding a link (Image Settings), modifying how the image is displayed (Dimensions), defining the alignment (Block), etc.
4.3 - Adding a Link
You can add links/hyperlinks associated with different parts of the newsletter. The three most common places to do this are: in a button, in an image, or associated with text.
- Button
To do this, click on the button and in the Content area, under Content, select the Web option from the Link Type dropdown menu and add the complete URL of the link you want to direct users to when they click the button in the Link Address field.
- Image
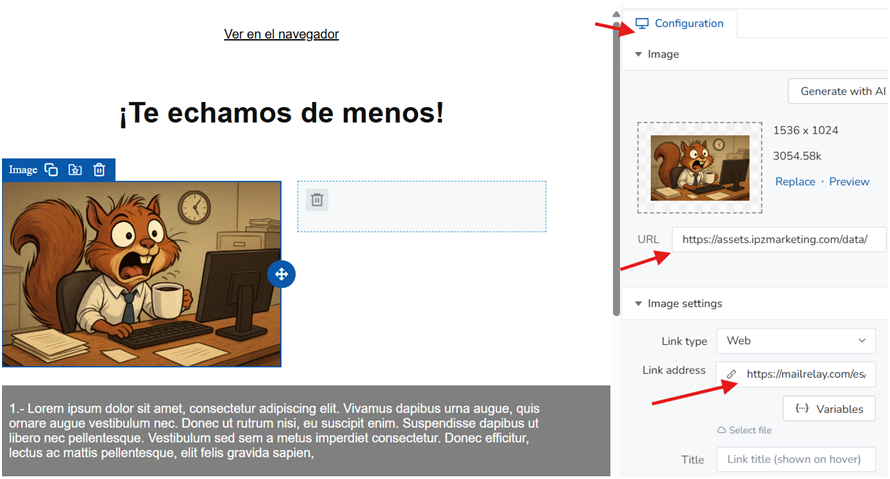
In this case, simply click on the desired image, then in the Content area, locate the Image Settings option and there, in Link Address, enter the complete URL of the link you want to take users to when they click on the image.
- Text
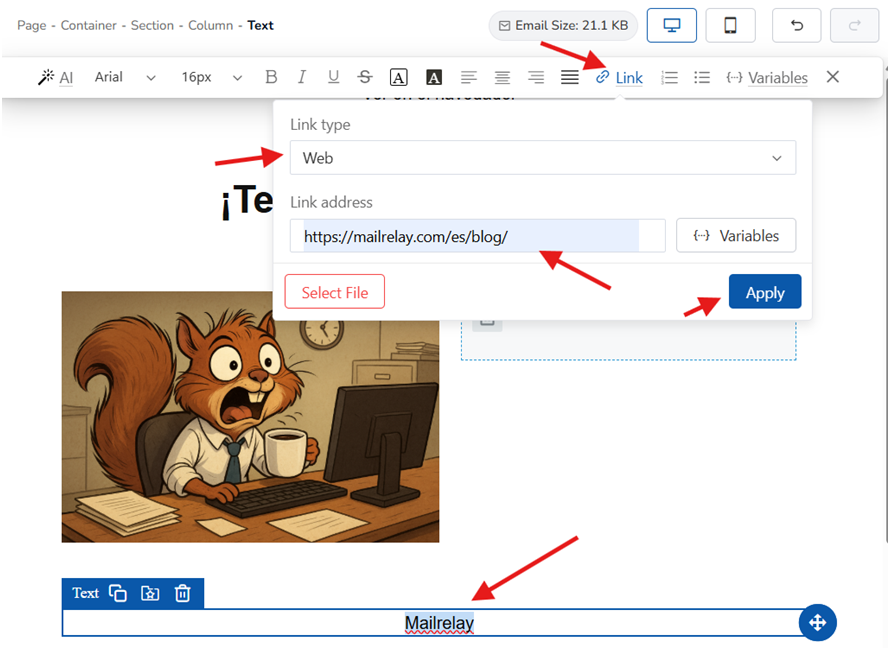
Finally, the most common way to do this is to place the link within the text. To do this, in any text box, select part of the text and then click on the Link option. This will open a window where you must indicate the Link Type you want (in this case, Web) and enter the complete URL of the link you want to take users to when they click on the selected text (Link Address option). Finally, click Apply.
4.4 - Adding Buttons
To add an image, drag the Button icon with your mouse and place it in the area of the newsletter where you want it to appear. Afterward, you can adjust the button's appearance and main options (from the Settings area).
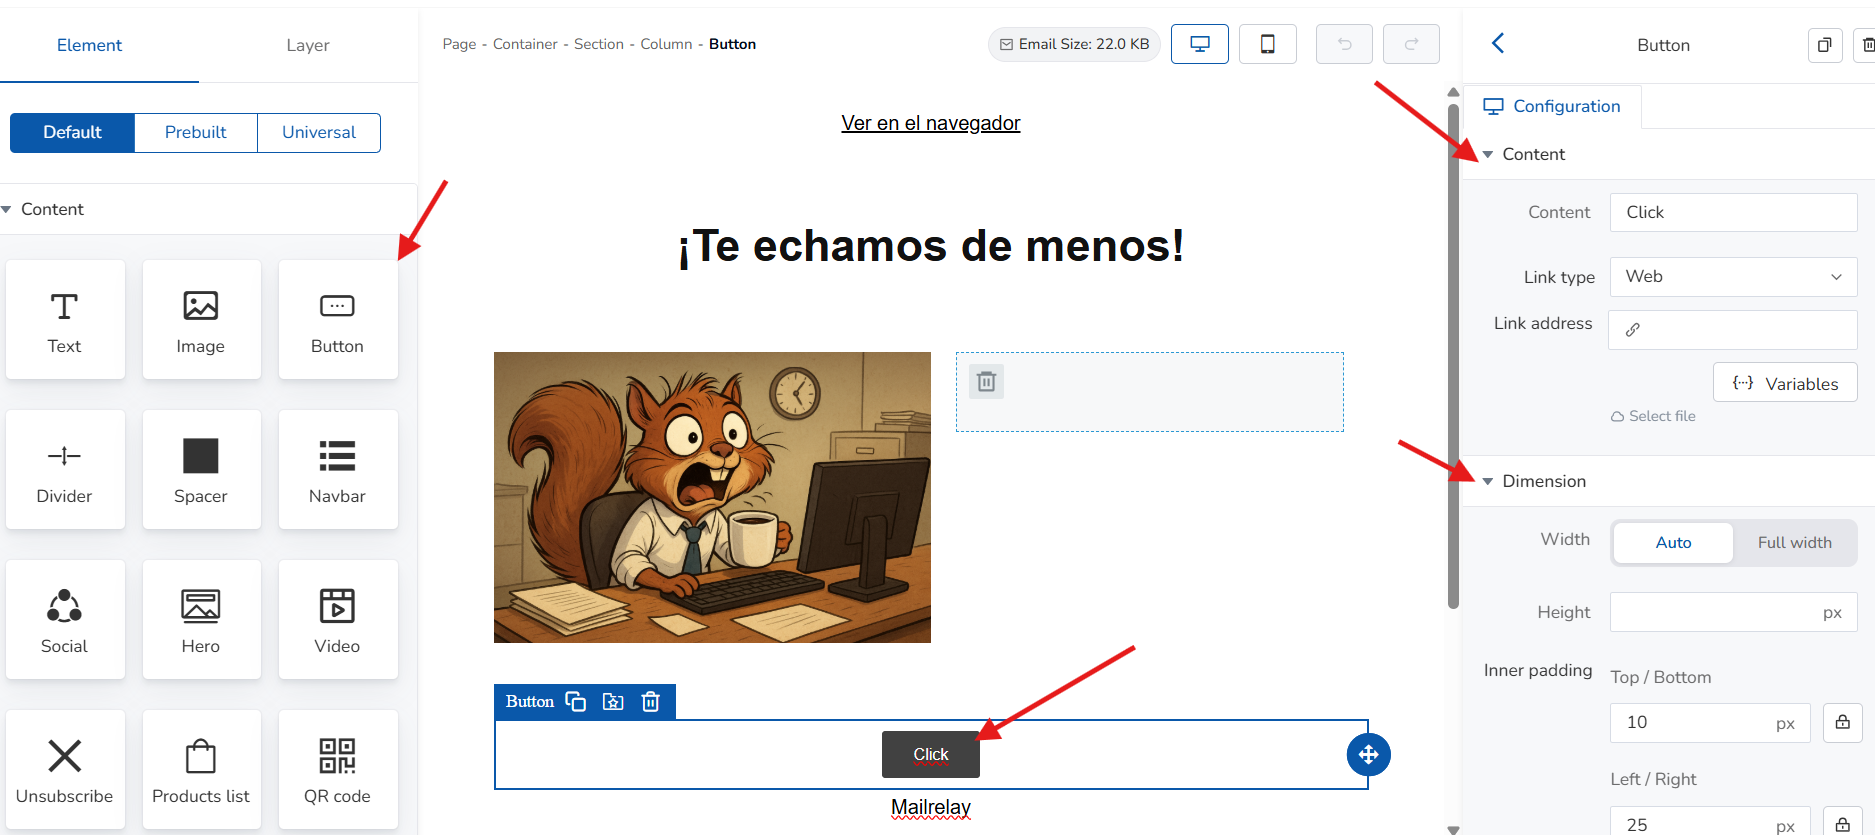
Among other things, you can include a link (Content option); adjust its size, padding, etc. (Dimension option); format the text, assign color to the text/containing box, line height, etc. (Typography option); and customize the border (Border option); among other options.
4.5 - Adding a Divider
To add a divider to create distinct zones between the different design elements, simply drag the Divider icon with your mouse and place it in the area where you want the image to appear.
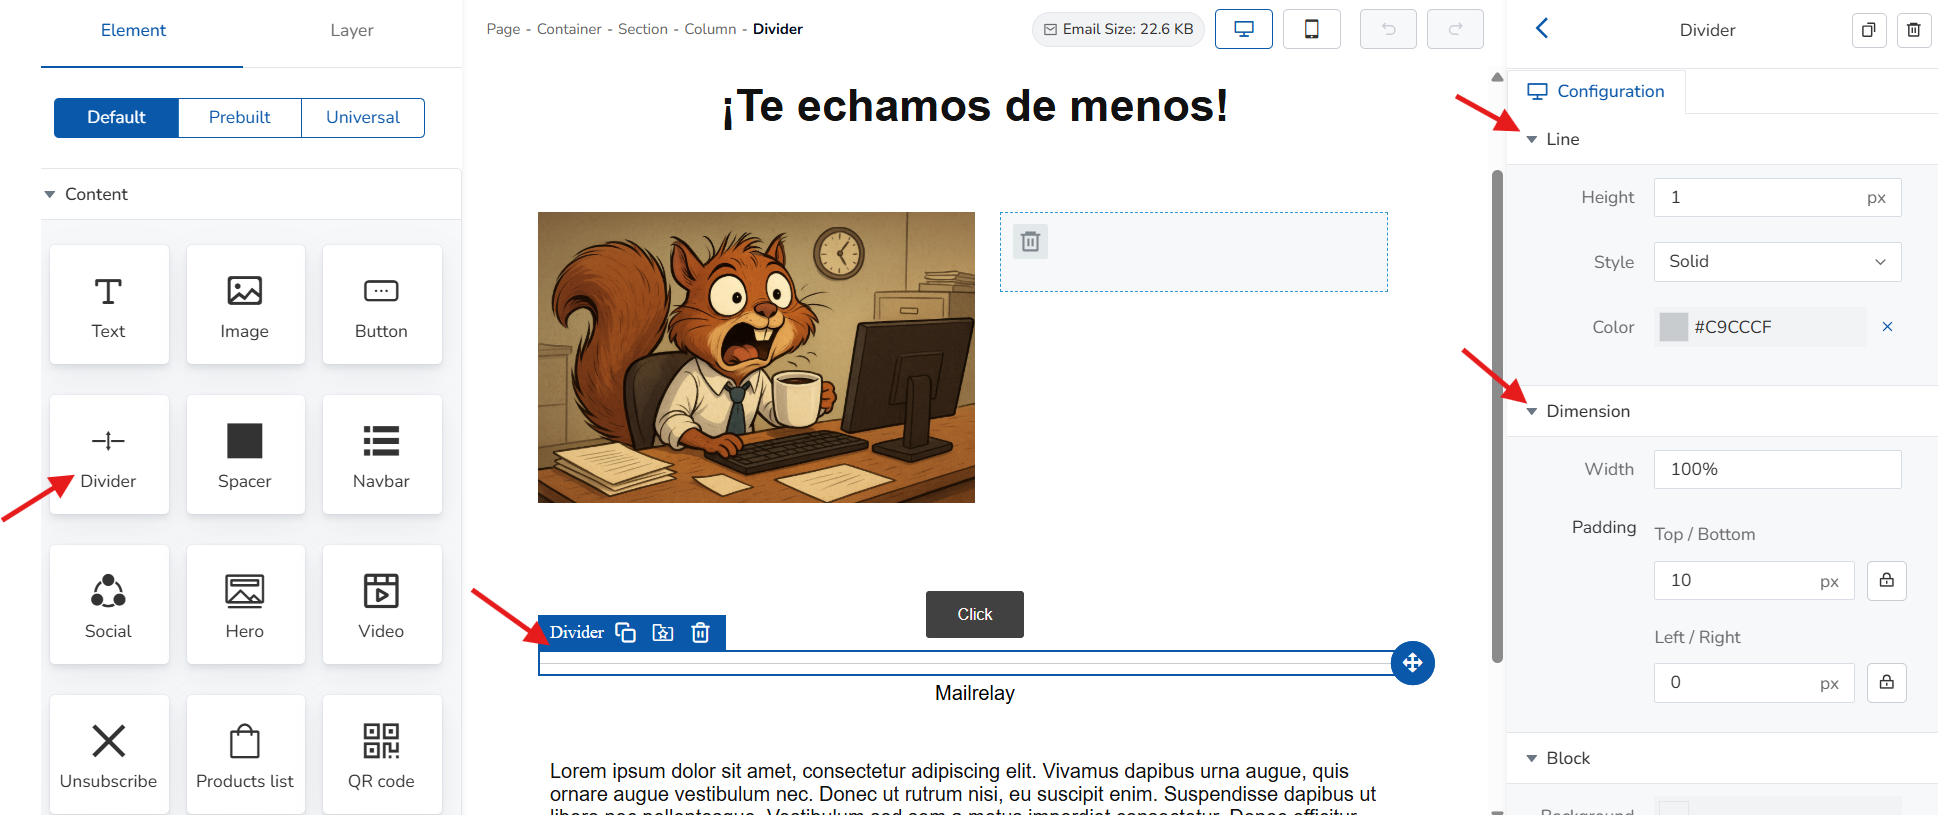
This will display the divider adjustment options in the Settings area. Among the available customization options are: color, thickness, style (Line option), size, and position (Dimension option), among others.
4.6 - Adding a Separator
To add a block separator, simply drag the Separator icon with your mouse and place it in the desired area.
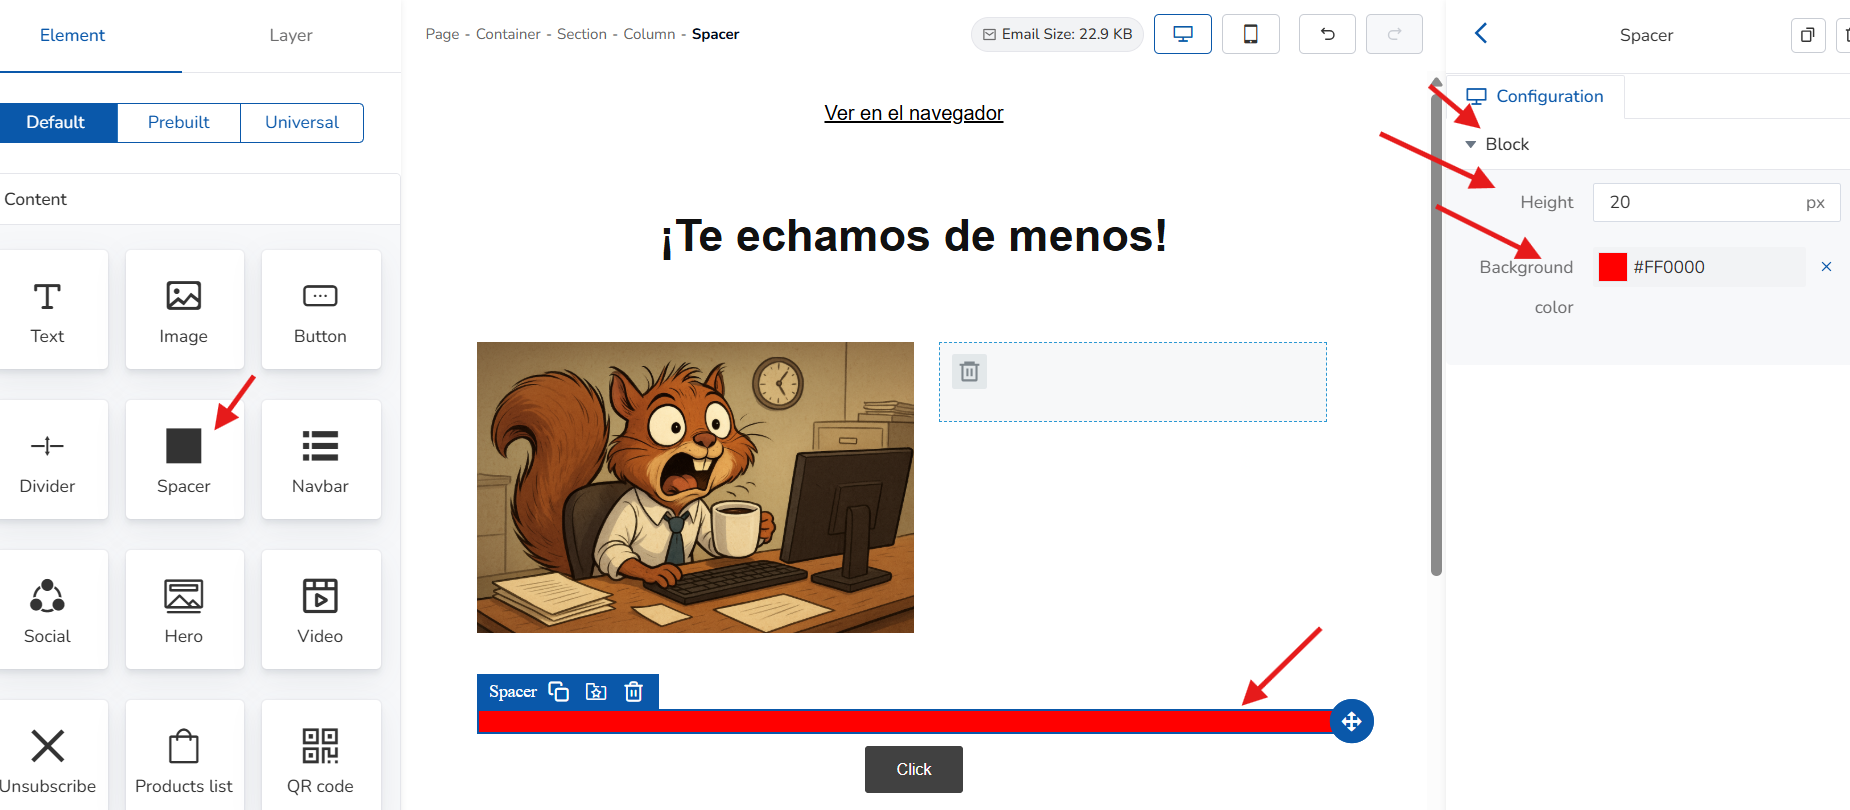
With this, in the Settings area, you can customize the separator: height in pixels and its color (Block option).
4.7 - Add a Navigation Bar
To add a navigation bar, drag the Navigation Bar icon with your mouse and place it in the area of the newsletter where you want it to appear, usually at the top of the design. Afterward, you can adjust its functionalities and main options (from the Settings area).
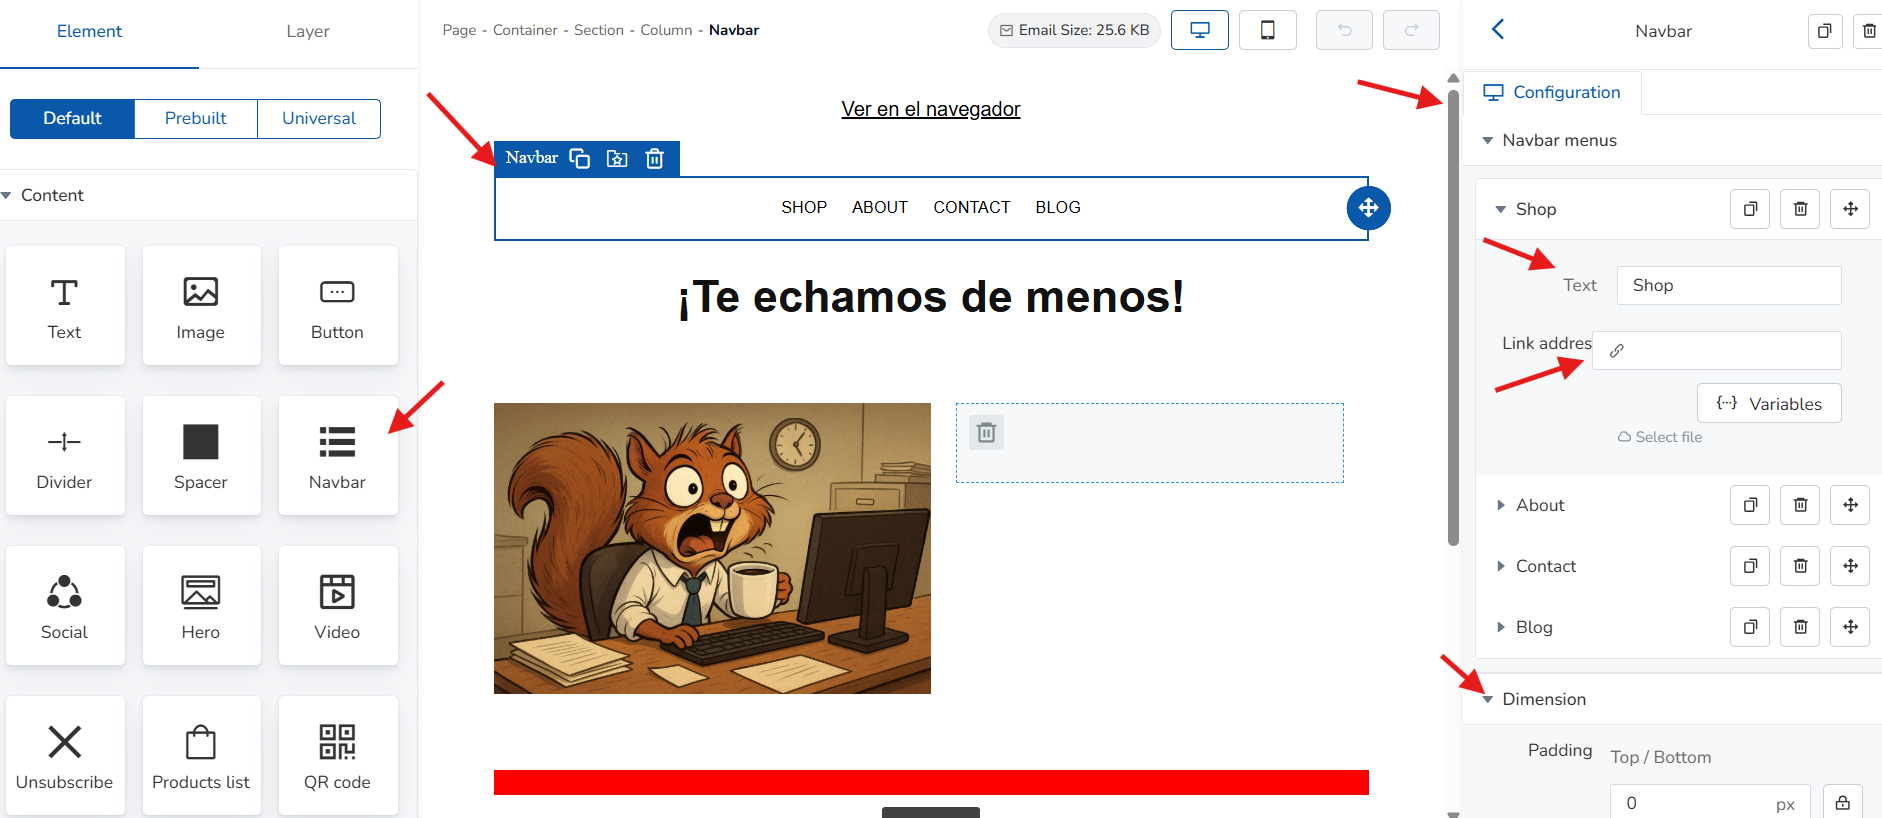
Among other things, you can change the text in the navigation bar, its placement, add links, etc. (from the Menus option in the navigation bar); adjust padding, etc. (Dimension option); format the text, assign color to the text/containing box, line height, etc. (Typography option); and customize the alignment (Border option); among other options.
4.8 - Adding Social Media
To add a social media section, drag the Social icon with your mouse and place it in the area of the newsletter where you want it to appear (usually at the top or bottom of the design).
After this, you can include a section for your social media within the design, and you can adjust its functionalities from the Settings area.
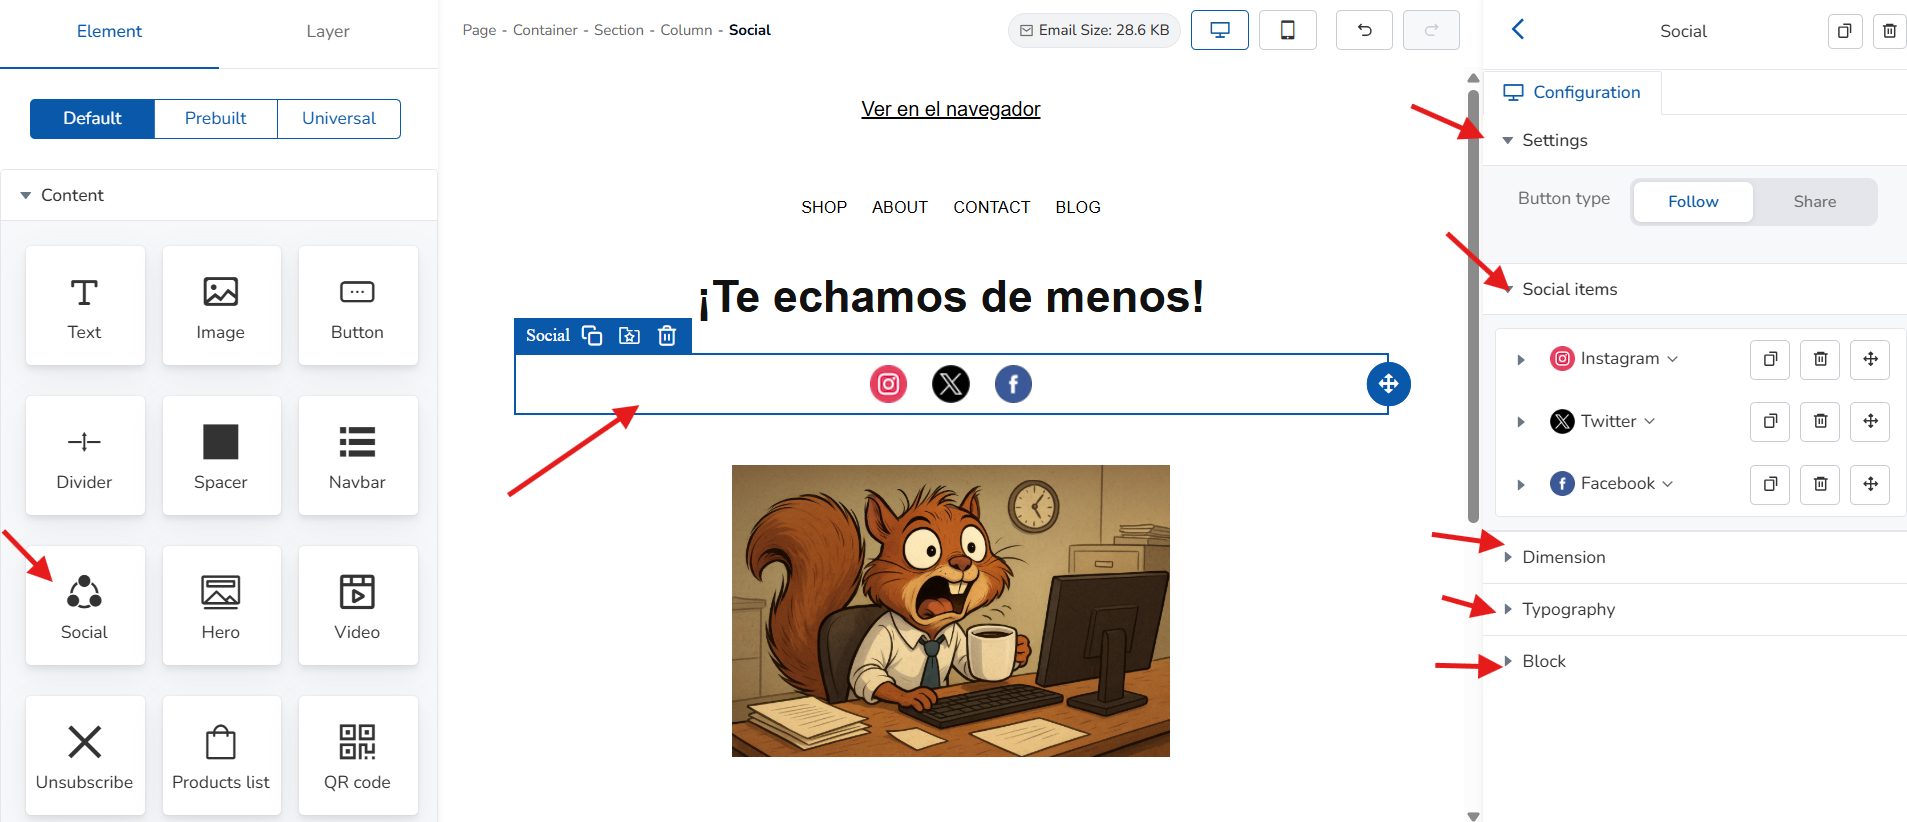
Among other things, you can define whether it's a link to allow people to follow you or to share content (Settings option); select the desired social network or enter a custom one, specifying the URL of your profile on that social network (Social Items option); define the size of the objects (Dimensions option); format the text, assign color to the text/containing box, line height, etc. (Typography option); and customize the border (Border option); among other possibilities.
4.9 - Adding the First Visual Block
To add a Hero section (the featured area at the top where you place the main message and a call to action), drag the Hero section icon with your mouse and place it in the area of the newsletter where you want it to appear, ideally at the top of the design.
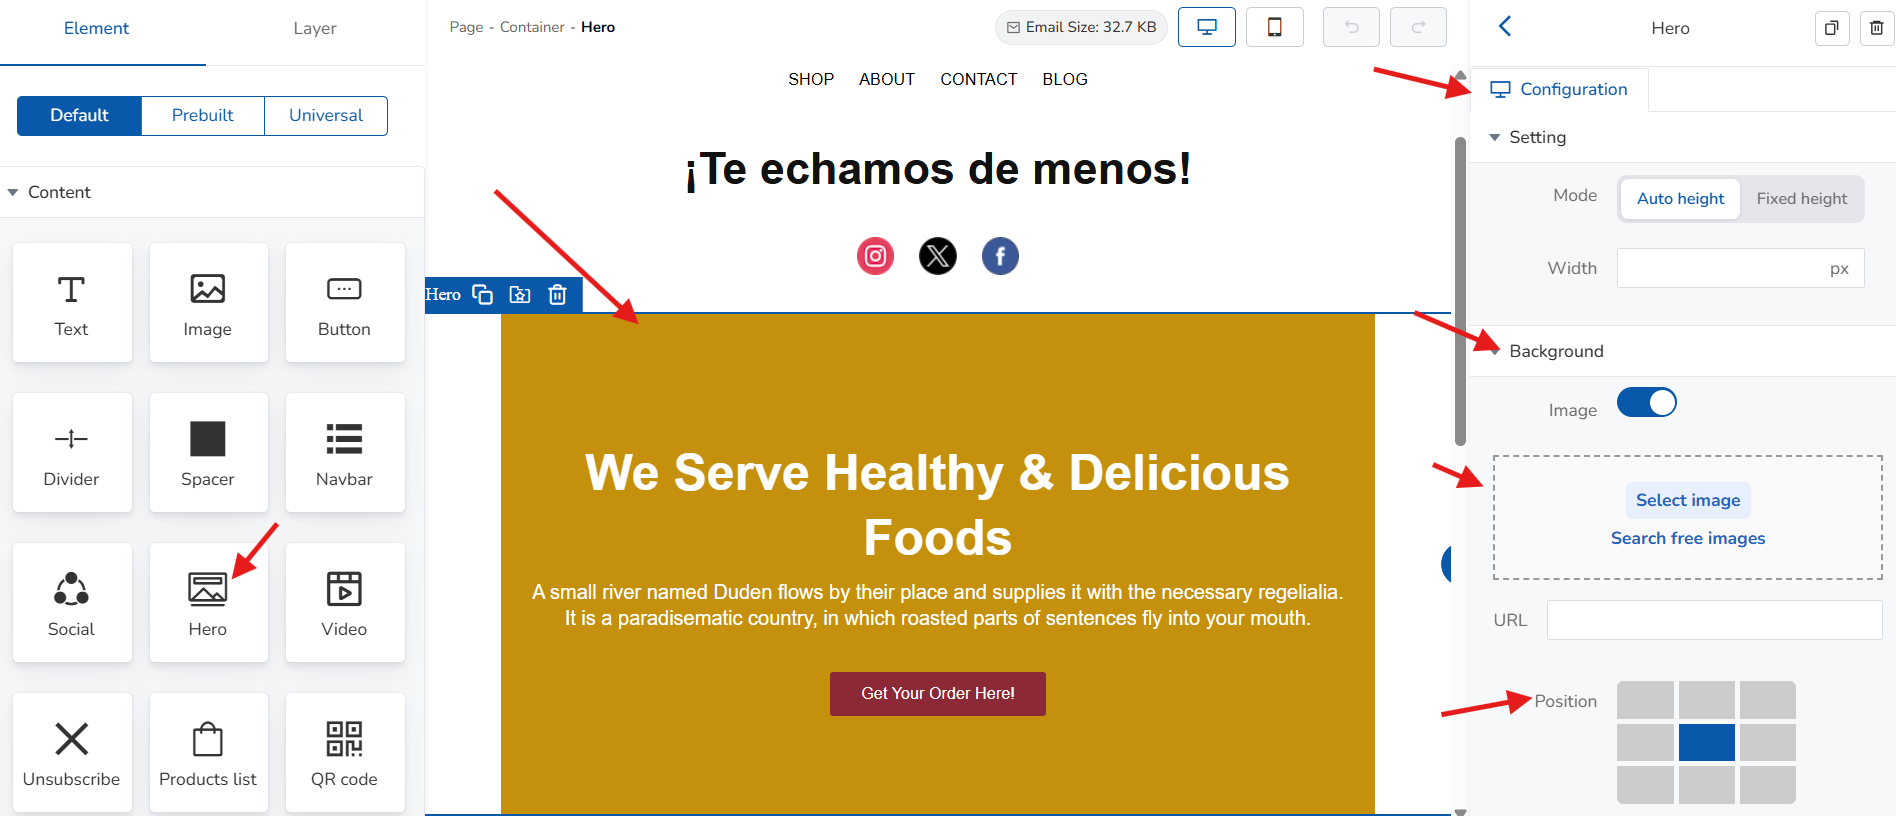
After that, you can begin customizing its appearance and behavior from the settings area. Some of the most notable options are: Settings, where you can specify the width, height, or whether the size adjusts dynamically, and position; Background, where you can define a background color or use a background image (Select image to use an image from your image library or Search for free images); etc.
To change the behavior of the call-to-action button, simply click on it and modify its behavior from the settings area.
4.10 - Adding a Video
To add a video to the newsletter, drag the Video icon with your mouse and place it in the area of the newsletter where you want the video to appear.
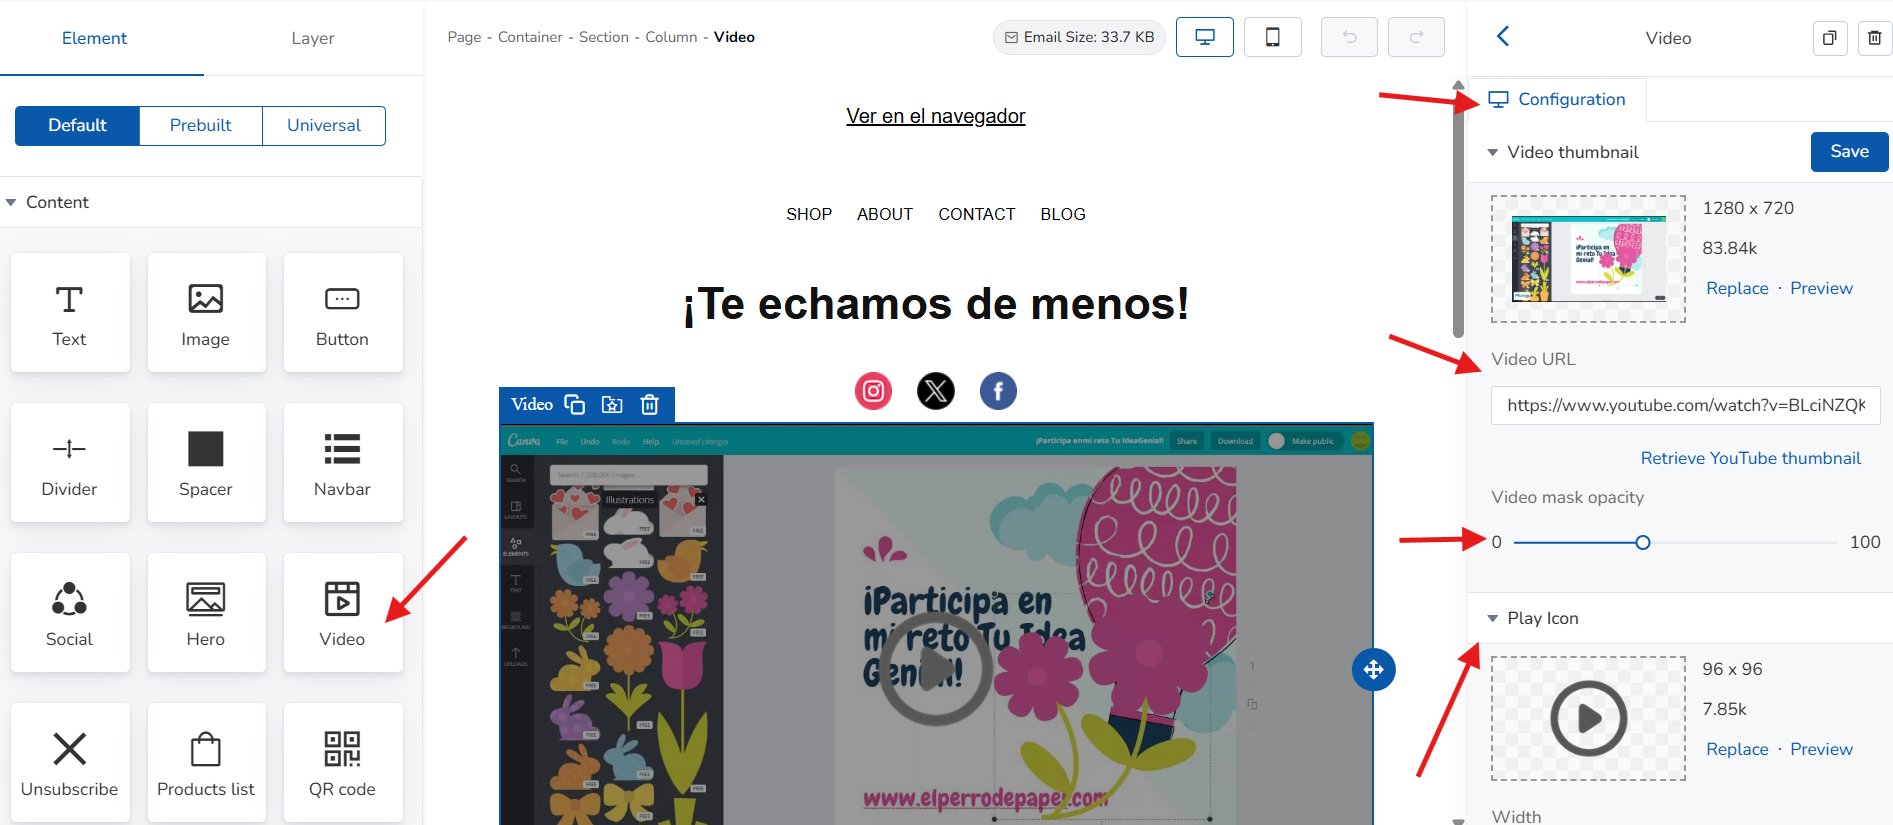
After that, you need to configure the video's behavior in the settings area.
The most important options are the video URL, where you must paste the URL of the video you want to include in the newsletter. A preview will automatically be generated, but if you want to change it, click "Replace" in the Video Thumbnail area.
You can also specify the opacity percentage to apply to the preview image (Video Mask Opacity) and change the typical play button (PLAY) to another one in the Play Icon area by clicking "Replace."
4.11 - Adding an unsubscribe link
To add an unsubscribe link to the newsletter, drag the Unsubscribe icon with your mouse and place it in the area of the newsletter where you want the video to appear (most commonly in the footer or header).
Simply drag and drop the unsubscribe link into your newsletter, and subscribers will unsubscribe from your mailings if they click on it (since the {{ unsubscribe_url }} variable is used by default).
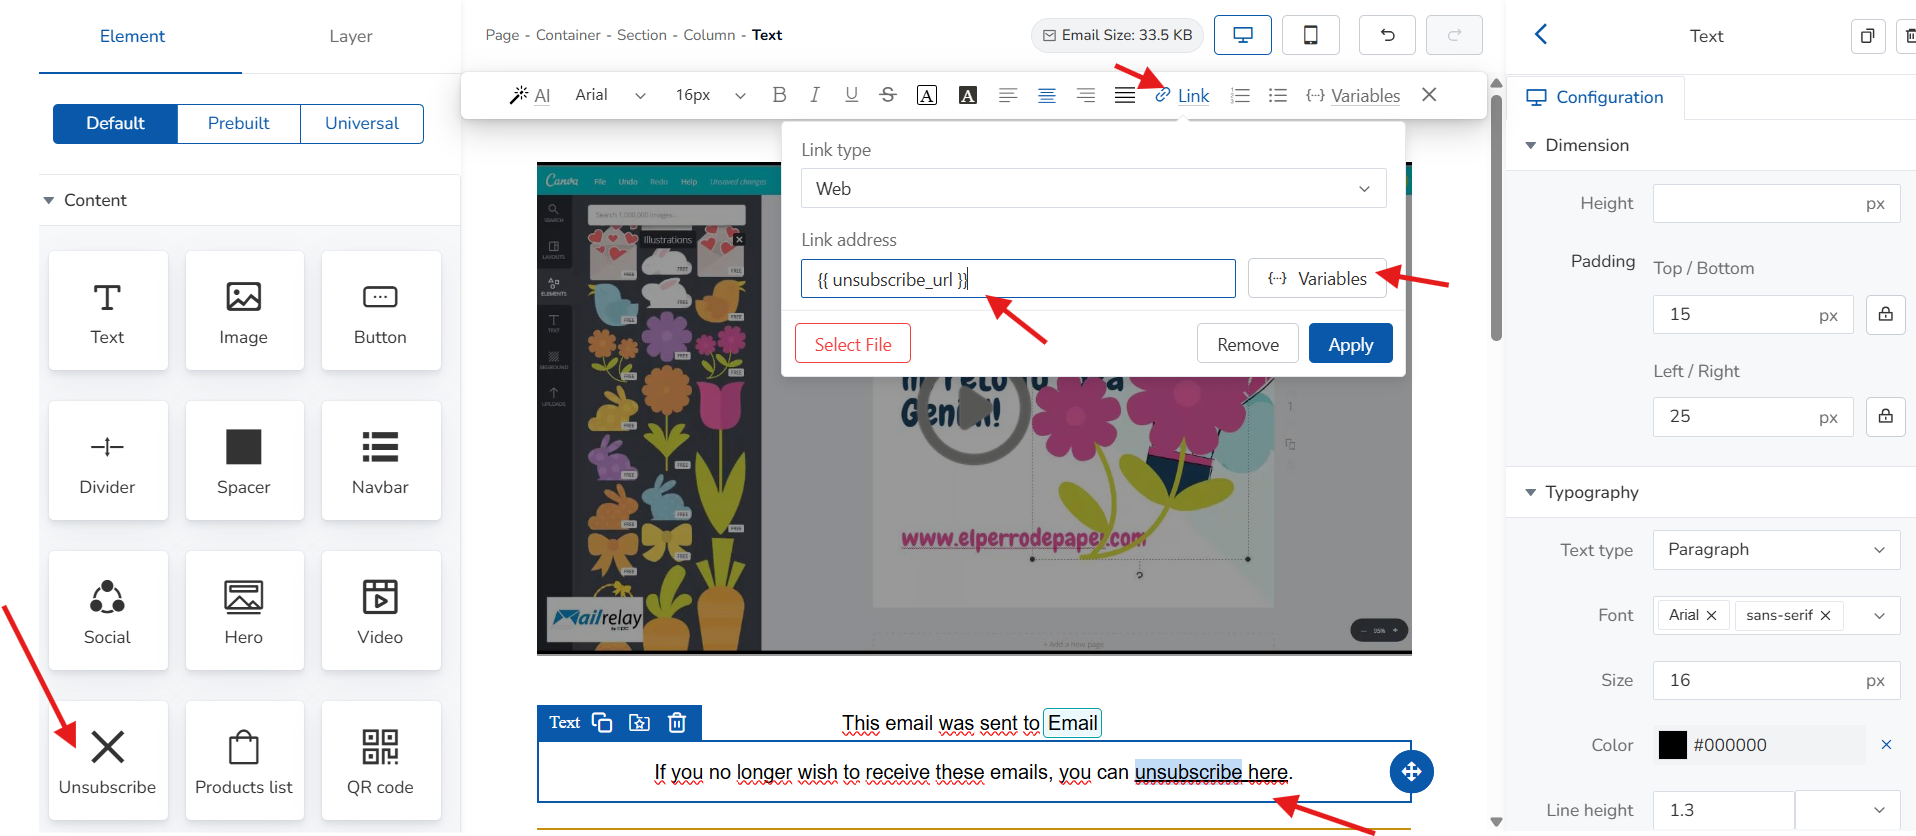
But you can change this behavior and use any of the three available unsubscribe variables:
{{ unsubscribe_url }} which directly unsubscribes the subscriber from the account;
{{ unsubscribe_url_click }} which requests email confirmation from the subscriber before unsubscribing them (sending a confirmation email with an unsubscribe link that the subscriber must click to unsubscribe);
{{ unsubscribe_url_groups }} which only unsubscribes the subscriber from the groups to which the newsletter has been sent (leaving them active in all other groups they belong to).
To change this, simply select the text "unsubscribe here" and click on the "Link" option, then on the "{...} Variables" button. This will open a pop-up window where you must select the desired variable and click "Apply".
Was this article helpful?
That’s Great!
Thank you for your feedback
Sorry! We couldn't be helpful
Thank you for your feedback
Feedback sent
We appreciate your effort and will try to fix the article