
In Mailrelay you can personalize the subject and the content of your campaigns with variables, such as each subscriber's name or the value of a custom field, and show different text to each subscriber with conditional blocks. You add variables from the Add variables button of the subject and from the Variables menu of the New editor with AI. If you create the campaign with Paste code, its editor also has a Variables drop-down. Conditional blocks are written inside the text.
All of this is also available on the free account. Personalizing each email is an important part of any email marketing strategy: with a single newsletter, each subscriber receives a message with their own data, even when you send bulk email to your whole list.
INDEX
- What variables and conditional blocks are
- How to add variables to the subject
- How to add variables to the content
- How to use your custom fields as variables
- How to show different text with conditional blocks
- How to use variables and conditional blocks with Paste code
- How to check the personalization with a test email
- Limitations
- Frequently asked questions
- Related articles
What variables and conditional blocks are
A variable is a code between double curly brackets, such as {{ subscriber.name }}, that is replaced with each subscriber's data when the campaign is sent. If you write «Hi {{ subscriber.name }}» in the subject, each subscriber receives their name in that place.
A conditional block is text that is only shown to the subscribers who meet a condition, for example, that their Sport custom field is «Tennis». The rest can be shown different text.
How to add variables to the subject
- Go to Campaigns >> Campaigns and click Add. Choose New editor with AI and click Create campaign.
- Write the Subject and click Create campaign. The campaign editing screen opens.
- In the Subject section, click Edit.
- Click Add variables and choose one of the variables in the Subscriber or Subscriber custom fields section. For example, if you choose Name, {{ subscriber.name }} is added to the subject.
- Click Save.
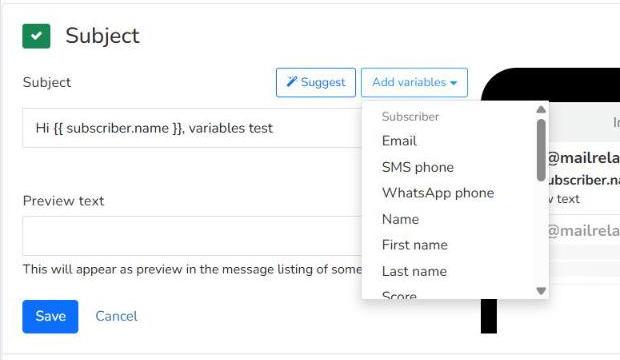
In the inbox preview shown on the right, the variable appears as it is, with its curly brackets. Each subscriber's name only appears in the email they receive.
You can type the variable yourself instead of choosing it from the menu. The result is the same.
How to add variables to the content
- On the campaign editing screen, in the Content section, click Edit. If it is a new campaign, choose a template first.
- Click a Text block and place the cursor where you want the variable.
- In the text toolbar, click Variables and choose the variable.
- Click Save.
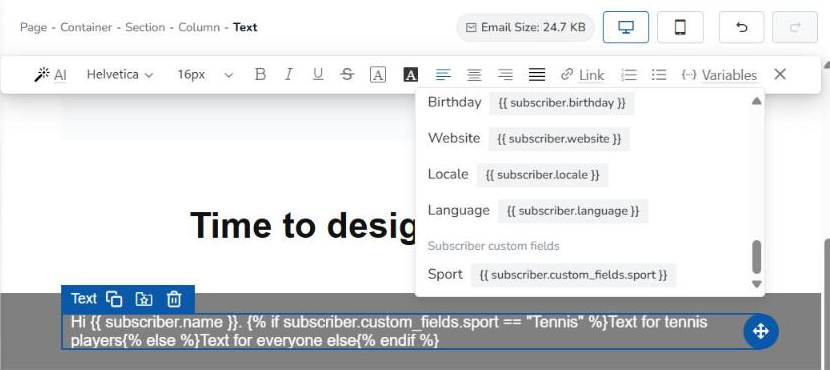
The variables you choose from the menu appear in the text as a tag with their name. You can also type the code yourself, for example {{ subscriber.name }}.
The Variables menu of the content has these sections:
- Campaign: ID ({{ campaign.id }}), Subject ({{ campaign.subject }}) and Test email ({{ campaign.test }}).
- Sender: ID ({{ campaign.sender.id }}), Email ({{ campaign.sender.email }}), From name ({{ campaign.sender.from_name }}) and Name ({{ campaign.sender.name }}).
- Subscriber: each subscriber's data (see the table below).
- Subscriber custom fields: the custom fields you have created in your account.
These are the variables in the Subscriber section. They are the same ones that appear in Add variables in the subject:
| Variable | Code |
|---|---|
| {{ subscriber.email }} | |
| SMS phone | {{ subscriber.sms_phone }} |
| WhatsApp phone | {{ subscriber.whatsapp_phone }} |
| Name | {{ subscriber.name }} |
| First name | {{ subscriber.first_name }} |
| Last name | {{ subscriber.last_name }} |
| Score | {{ subscriber.score }} |
| Status | {{ subscriber.status }} |
| Address | {{ subscriber.address }} |
| City | {{ subscriber.city }} |
| State | {{ subscriber.state }} |
| Country | {{ subscriber.country }} |
| Birthday | {{ subscriber.birthday }} |
| Website | {{ subscriber.website }} |
| Locale | {{ subscriber.locale }} |
| Language | {{ subscriber.language }} |
How to use your custom fields as variables
If you need data that is not on the list, such as each subscriber's favorite sport, create a custom field:
- Go to Subscribers >> Custom fields and click Add.
- Choose the Field type: Text, Textarea, Number, Select, Select (multiple), Checkbox, Radio buttons or Date.
- Write the Label (for example, «Sport») and the Tag name (for example, «sport»). The tag is the one used in your campaigns and it should only contain letters and numbers.
- Click Create Custom field.
The field appears in each subscriber's record, in Edit subscriber, where you can fill in its value and save it with Update Subscriber. More information in the article Custom fields and campaign segmentation.
From then on, the field appears in Add variables in the subject and in the Variables menu of the editor, in the Subscriber custom fields section, with the code {{ subscriber.custom_fields. followed by the tag name. For example, {{ subscriber.custom_fields.sport }}.
How to show different text with conditional blocks
The editor does not have a button to create conditional blocks: the condition is written inside a Text block, with this format:
{% if subscriber.custom_fields.sport == "Tennis" %}Text for tennis players{% else %}Text for everyone else{% endif %}
- Between {% if and %} goes the condition: the variable, == and the value in quotation marks.
- Next goes the text that subscribers who meet the condition will see.
- Between {% else %} and {% endif %} goes the text that everyone else will see.
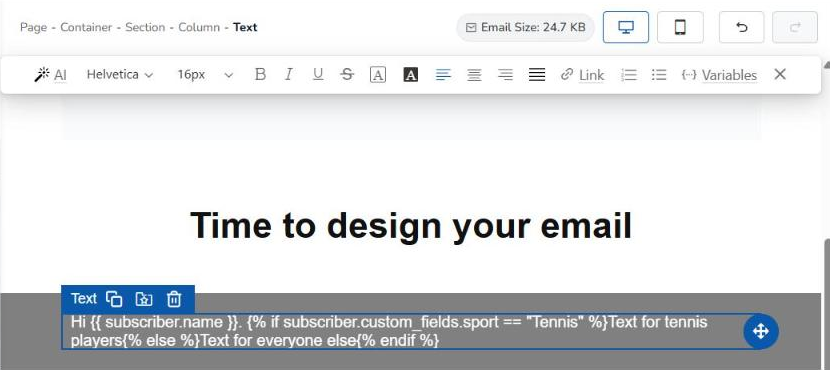
With this example, the subscriber who has «Tennis» in the Sport field receives the first text, and a subscriber with no value in that field receives the {% else %} text.
This way you can adapt the same newsletter to different interests instead of creating a campaign for each group, which is useful in email marketing for businesses with different audiences.
How to use variables and conditional blocks with Paste code
If you prefer to create the campaign with your own HTML, you can also use variables and conditional blocks. In Campaigns >> Campaigns, click Add and, under For advanced users, choose Paste code.
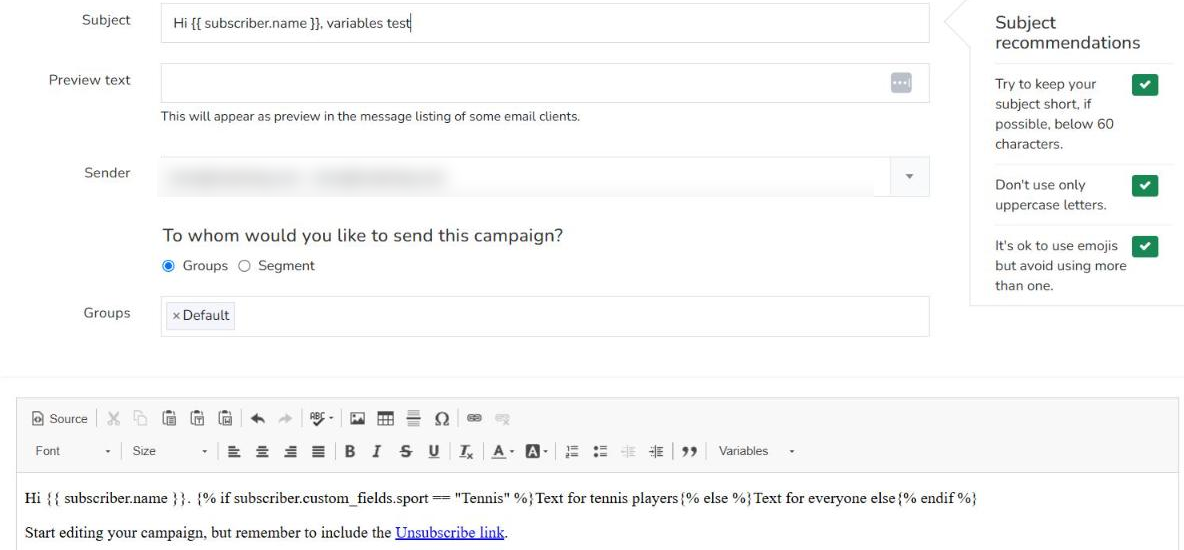
- In Subject, type the variable yourself, for example «Hi {{ subscriber.name }}». On this screen, the subject has no button to add variables.
- In the editor, place the cursor where you want the variable, open the Variables drop-down in the toolbar and choose the variable. Its code is added to the text, for example {{ subscriber.custom_fields.sport }}.
- To show different text, write the condition in the editor text, with the same format as in the New editor with AI.
- In To whom would you like to send this campaign?, choose Groups or Segment (it is required to create the campaign) and click Create Campaign.
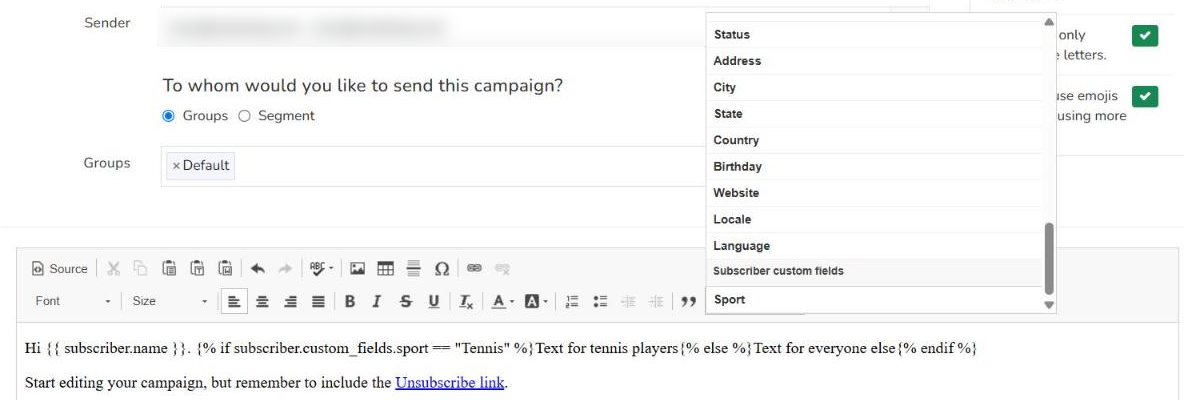
The Variables drop-down of this editor has the same sections as the one in the New editor with AI (Campaign, Sender, Subscriber and Subscriber custom fields) and, in addition, Unsubscribe URLs and other campaign variables, such as Web version.
To check the result, open the campaign and click Send. Select Send a test email, write the addresses in Test emails and click Send test email. You will see a confirmation message that the test email has been sent. If you send the test to the address of a subscriber in your account, the email arrives with their data, just as with the New editor with AI.
How to check the personalization with a test email
On the campaign editing screen, click Send test email, write the address in the Send test email window (you can send to multiple recipients by separating them with commas) and click OK. You will see a confirmation message that the test email has been sent.
If you send the test to the address of a subscriber in your account, the email arrives with that subscriber's data: their name in the subject, the value of their custom fields and the conditional text that applies to them. This way you can review your mailing before sending it to your whole list.
When everything is right, send the campaign as usual. We explain how in the article How to send a campaign.
Limitations
- The Preview text field does not have the Add variables button.
- If a subscriber does not have a piece of data, the variable is replaced with a blank. For example, «Hi {{ subscriber.name }}» arrives as «Hi ,» to a subscriber without a name. Check that your subscribers have that data before using it in the subject.
- Neither the New editor with AI nor the Paste code editor has on-screen options to create conditions: you have to write them as explained above.
- If you want to send completely different content to part of your list, you can create another campaign and send it to a group or a segment.
Frequently asked questions
Can I use variables on the free account?
Yes. Variables in the subject and in the content, custom fields and conditional blocks are available on the free account.
Can I put the subscriber's name in the subject?
Yes. In the subject, click Add variables and choose Name. {{ subscriber.name }} is added and each subscriber receives their name.
Can I use variables if I create the campaign with Paste code?
Yes. The Paste code editor has the Variables drop-down and you can write conditions in the text. In the subject, type the variable yourself.
What happens if a subscriber does not have the data for the variable?
Nothing appears in its place. If you use a condition with {% else %}, that subscriber receives the {% else %} text.
Can I see the result before sending the campaign?
Yes. Send a test email to the address of a subscriber in your account: the email arrives with their data. In the editor and in the subject preview, variables are shown with their curly brackets.
How do variables help my email marketing campaigns?
With variables and conditional blocks, a single newsletter reaches each subscriber personalized, with their name and with the content that interests them. This way you don't have to prepare a different campaign for each case in your email marketing platform.